How to Set Up Jira Time Tracking Effectively: Native & Everhour
Time tracking is one of the most critical aspects of any software development project, so much so that managing time well is one of the hallmarks of an excellent team.
However, it’s not always easy to track work schedules for complicated projects. There are too many complex moving and inter-reliant parts. And Jira – one of the best project management systems – can serve all your complex tracking needs.
Curious? This article will discuss everything you need to know about Jira time tracking (including our own Jira time tracking integration) and how it can help your team perform at its best.
TL;DR
There are 3 options to track time in Jira:
- Stick to the native time tracking option with its drawbacks and limitations.
- Opt for the Jira time tracking integration with Everhour, offering comprehensive features from tracking to real-time task feeds.
- Explore the Free and lightweight timer add-on, designed to simplify and enhance the time tracking experience within Jira.
How to Setup Jira Native Time Tracker?
1️⃣ Signing up
In this section, we’re going to teach you how to set up Jira on your team’s devices, as well as how to log time in Jira.
1. The first thing that you need to do is head over to Jira’s webpage.
2. Here, you will find a short explainer of what Jira is, its capabilities, and additional information for you to get started. You will also find a blue “Get it free” button on the page’s upper left and right corners. Click either of these buttons to make an account.
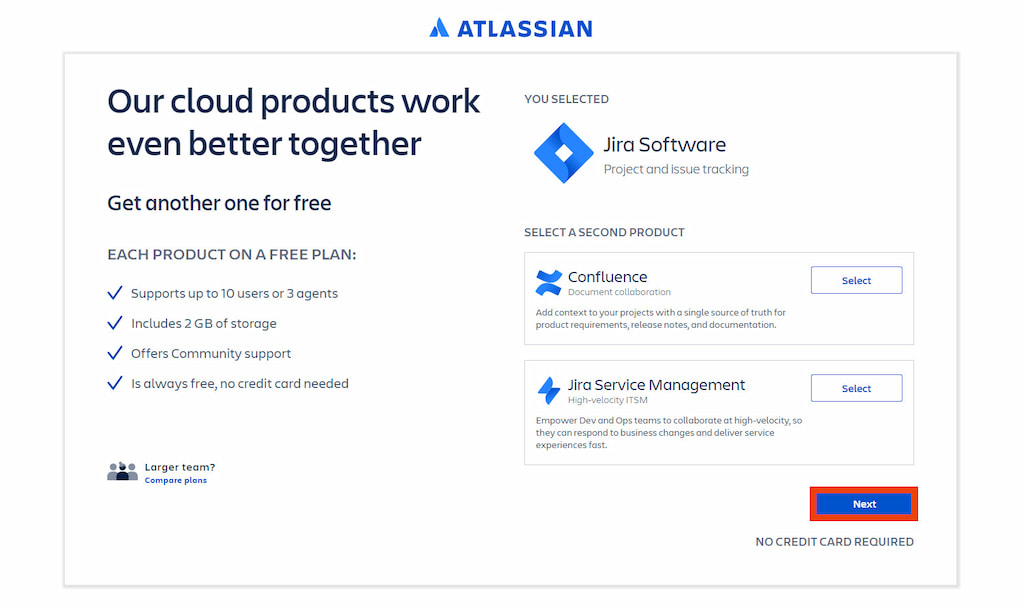
3. On the next page, you will choose between two Jira Softwares: Confluence and Jira Service Management. Each product has its pros, cons, and use cases, so you need to decide which one better suits your current goals. Once you have chosen, click the blue Next button.
4. You will then be brought to a sign-up page, where you can sign up with your email address or with an existing Google account.
5. Confirm your account creation with the blue “Agree” button after you’ve registered your account.
6. A confirmation email will be sent to your email account. Go to your email and click the link to verify your Jira account.
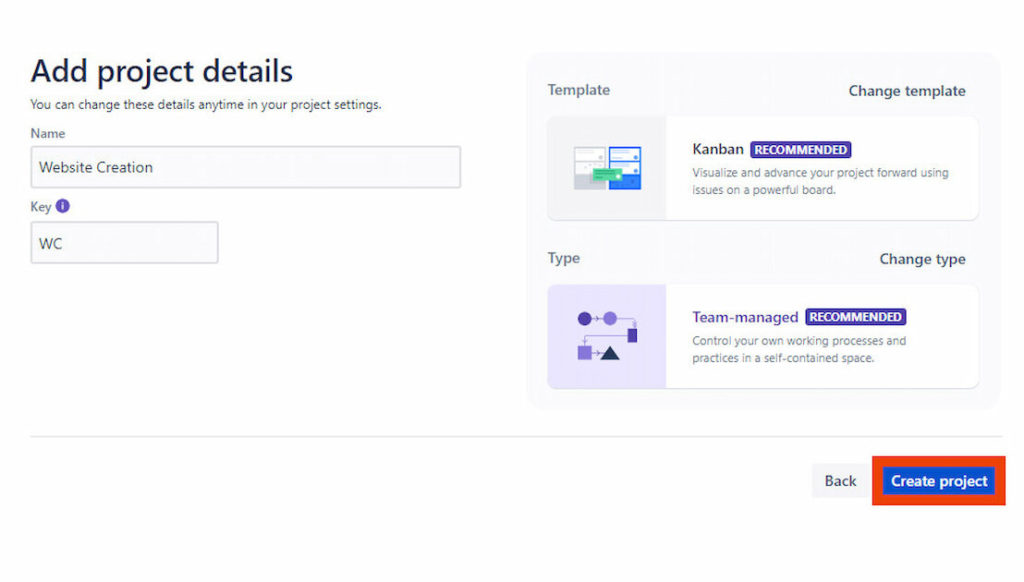
7. You will then need to create your project management platform. Simply provide all of the details required and follow all the instructions until you finish the sign-up process. Once everything’s been filled out, just click Create Project and you’ll now have access to your first Agile board on Jira.
2️⃣ Enabling time tracking
You won’t be able to track time on Jira if you don’t enable time tracking first. It’s not turned on by default, so here are the steps to do that:
1. First, create a sample issue.
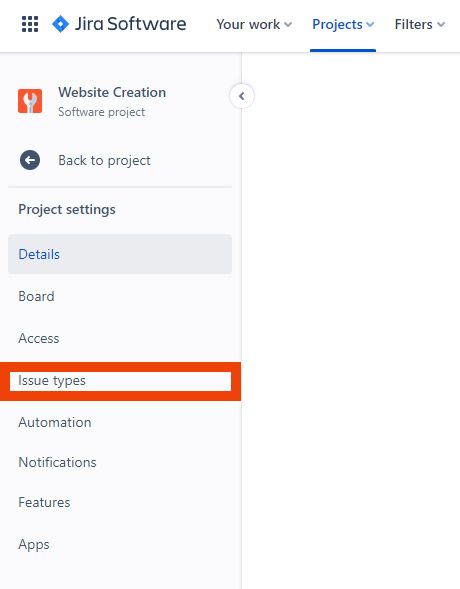
2. Click Project Settings at the left sidebar. Then click Issue Types.
3. You should see a menu on the lower right side of the page. Drag and drop Time Tracking to the Context Fields section. Once it’s there, click Save Changes.
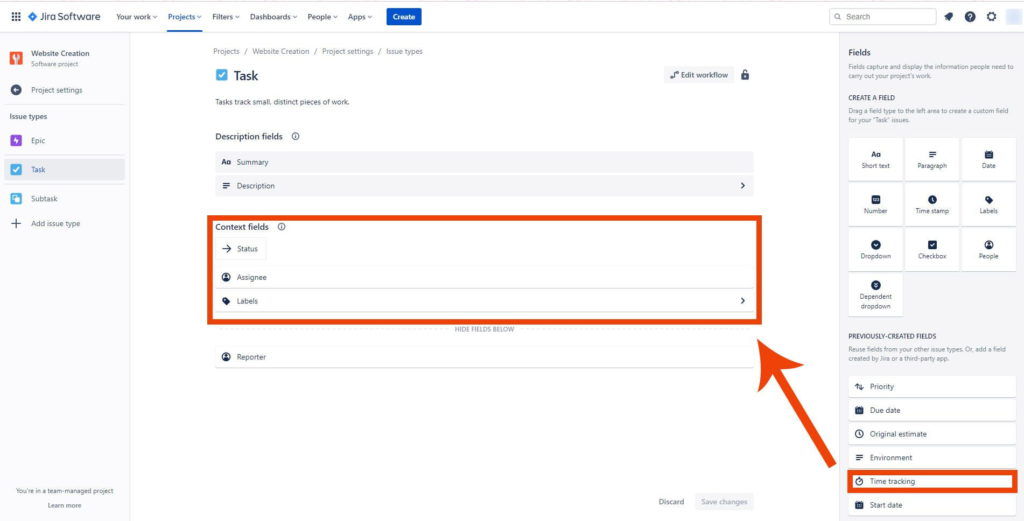
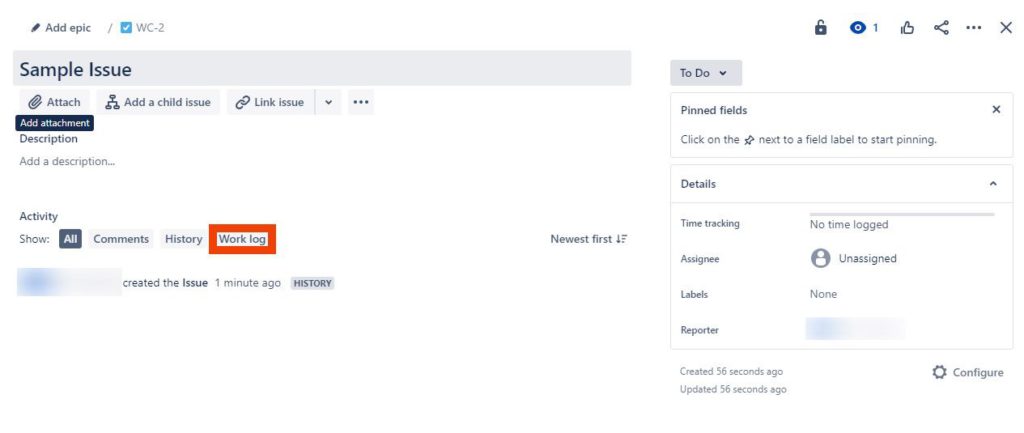
4. You should now see Log Work, after All, Comments, and History.
3️⃣ Your first work log
Now that you have a dashboard, it’s time to talk about how you can log work in Jira. In Jira, you can only log time for issues. Issues are specific elements under a story – a set of tasks that you need to perform to meet project demands or customer feedback.
This means that the first step to creating your first work log is to create an issue first. Luckily, this is a very simple process.
1. After logging into Jira, you’ll automatically be brought to your first project’s dashboard.
2. If you want to create a new project, navigate to the top of the UI, click Projects, and pick Create New Project in the drop-down menu.
3. Once you’re on the correct project dashboard, click the issue where you want to log time. If you don’t have one yet, simply click Create Issues and fill in all the necessary details.
4. After clicking the specific issue, you’ll see several options under Activity, namely All, Comment, History, and Work Log. Here, click Log Work.
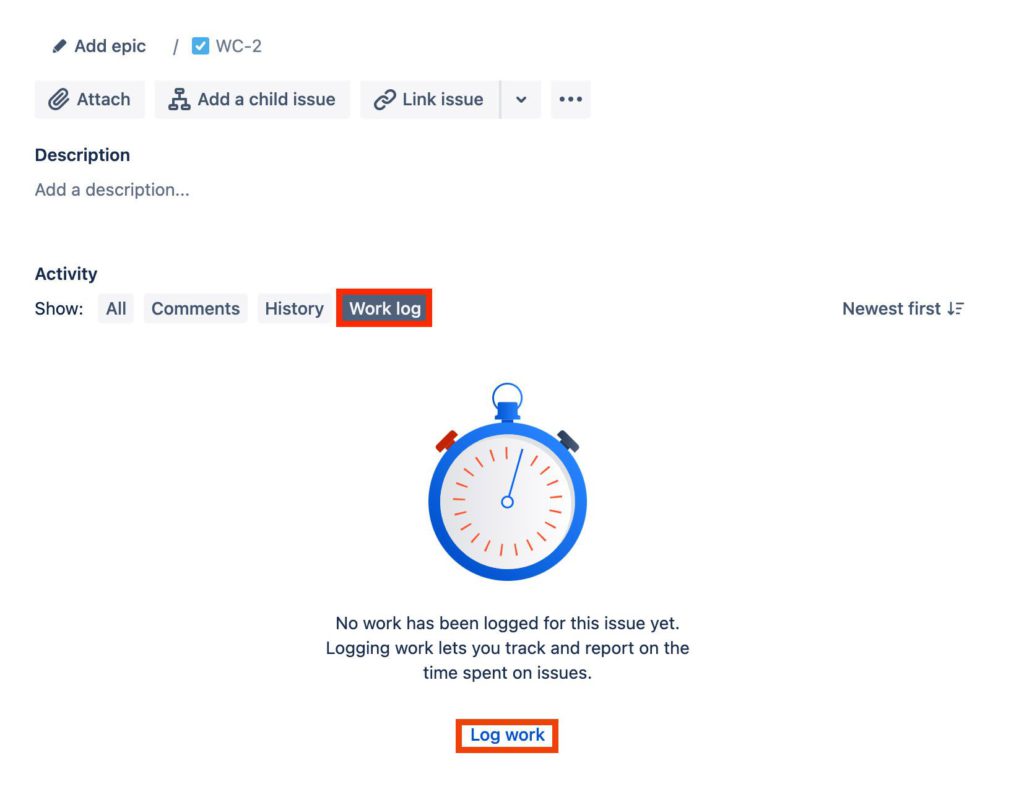
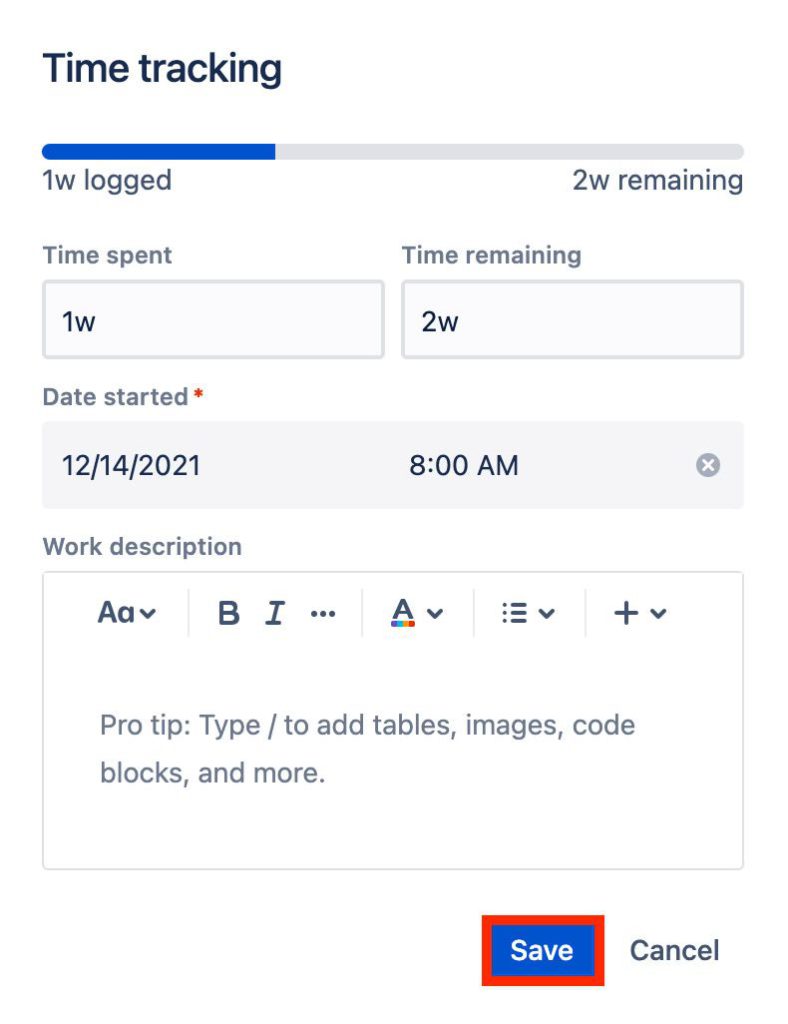
5. This will allow you to log your work time for this particular issue. Click Save when you’re done.
We can see that tracking work times with Jira’s default settings alone can be troublesome, especially if you have multiple issues across multiple projects.
Luckily, there’s another option if you want to log time more efficiently and maximize your Jira workflow.
Free Jira Time Tracking Plugin
💰 Pricing: Free
🔨 How to install: Install the Free Jira timer plugin from the Atlassian Marketplace and start tracking time

This add-on offers several advantages over native time tracker:
- Easily manage and monitor time directly from the issue details modal.
- Intuitive controls make time tracking accessible to all team members, regardless of their familiarity with time tracking tools.
- The Time tab organizes entries in a well-structured table, allowing you to quickly review and analyze past entries.
- Whether you prefer timers or manual entry, our add-on adapts to your workflow, providing a lightweight and adaptable solution.
How to Set Up Everhour Time Tracking Integration for Jira
💰 Pricing: Free plan, Monthly – $10 per user; Yearly – $8.50 per user
🔨 How to install: Sign up with Everhour, invite your team, and just install this Everhour-Jira plugin from the Atlassian Marketplace
Everhour is an excellent Jira time tracker plugin, and it expands your time tracking functionality to match the project management capabilities of the platform.
With Everhour seamlessly functioning alongside your workflow, you won’t ever have to worry about tracking every second of your time and all of the other responsibilities that come with it. There are two methods that you can use to install Everhour.
If you don’t have an Everhour account yet:
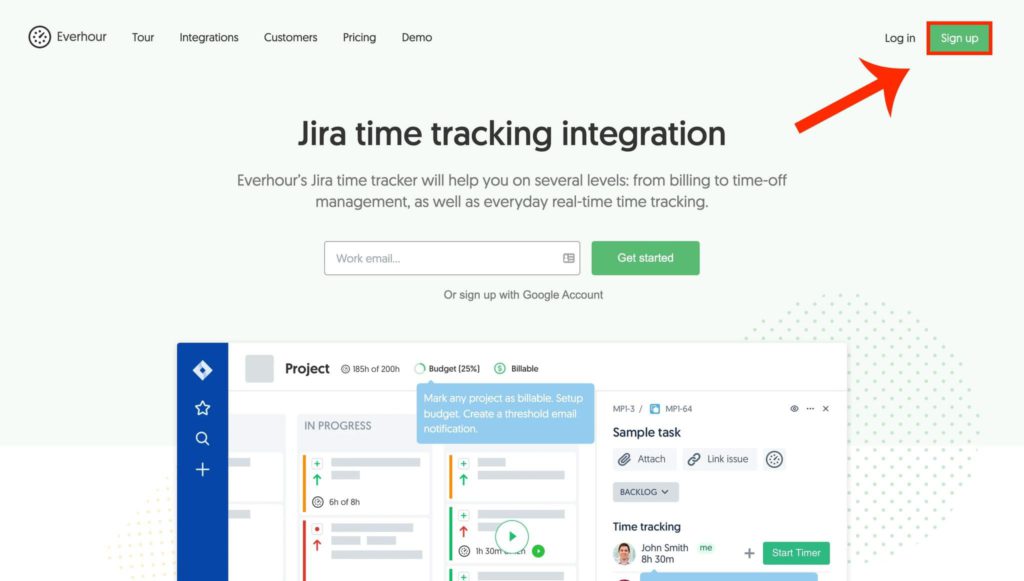
1. First, you need to register an account on the Everhour website by clicking the Sign-Up button at the upper right. It’s a paid subscription, however, you can use the 14-day trial version to see what it’s capable of.
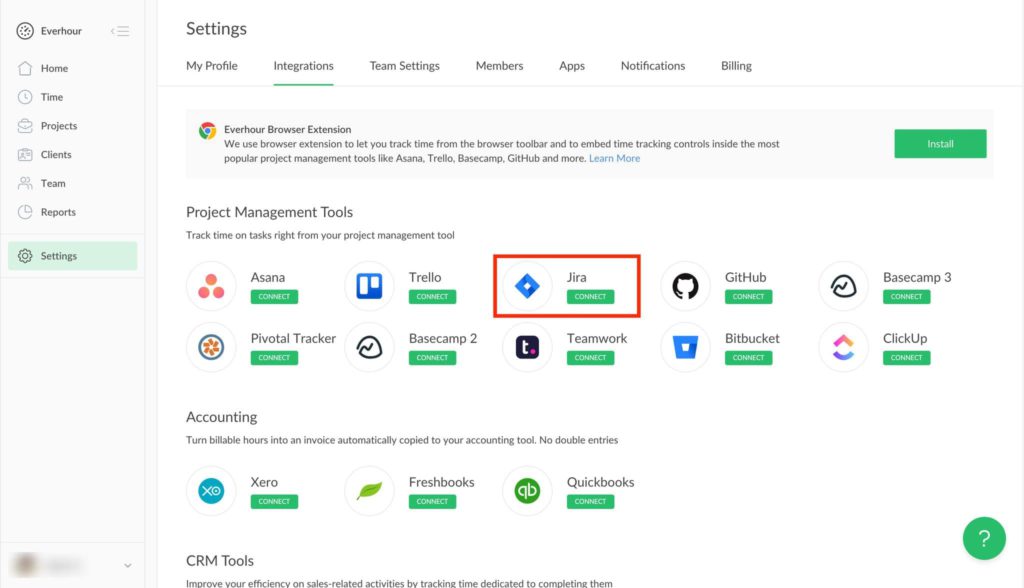
2. With your Everhour account up and running, you can begin setting up the Jira platform. Click the Integrations tab.
3. Choose the version of Jira you have for your team. This tutorial will proceed with the Cloud version, but you can also find the server version tutorial here.
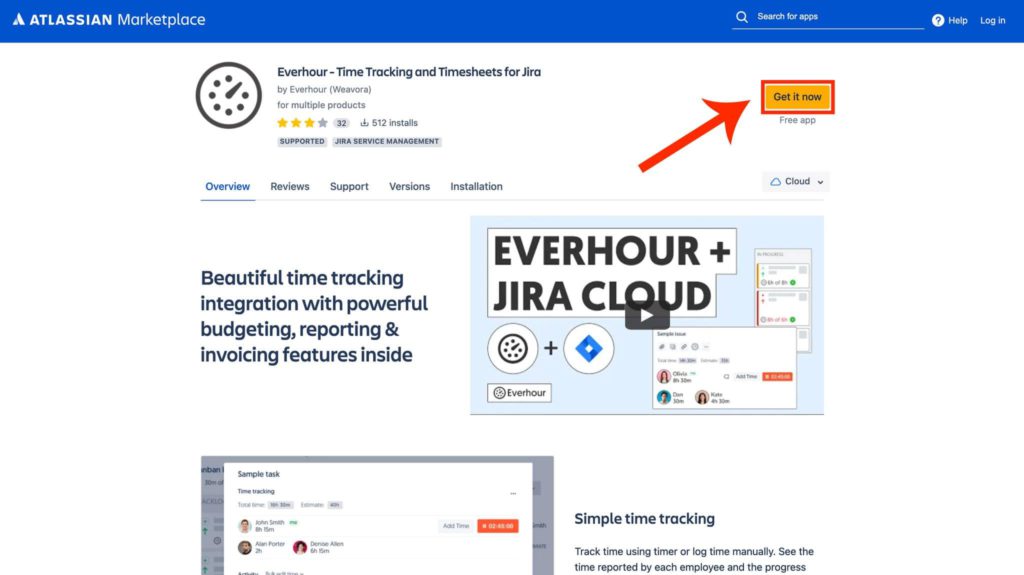
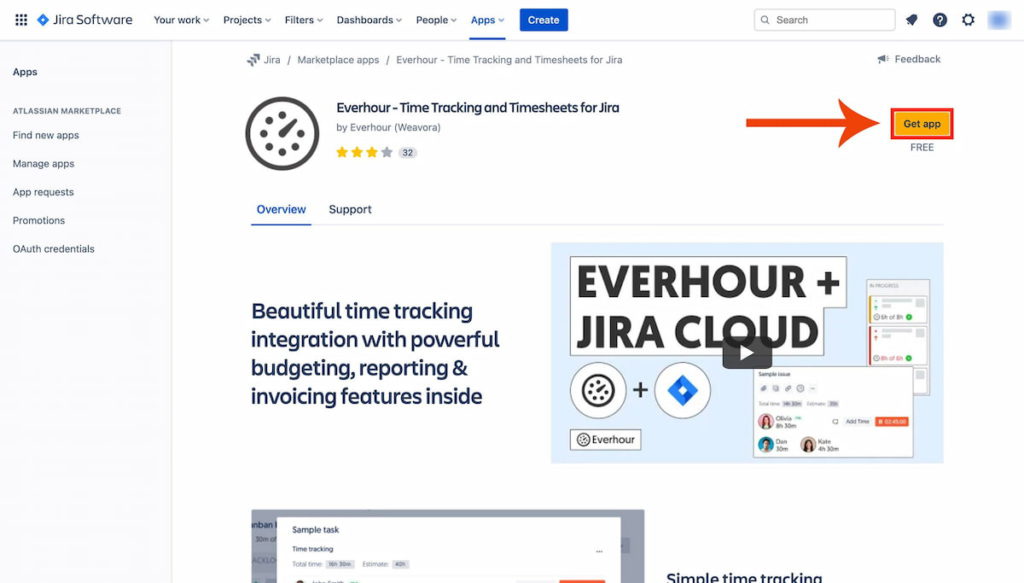
4. Under the Installation section, you will find a hyperlink to the Everhour app in the Atlassian marketplace. Click that, and you will be redirected to the Everhour plug-in.
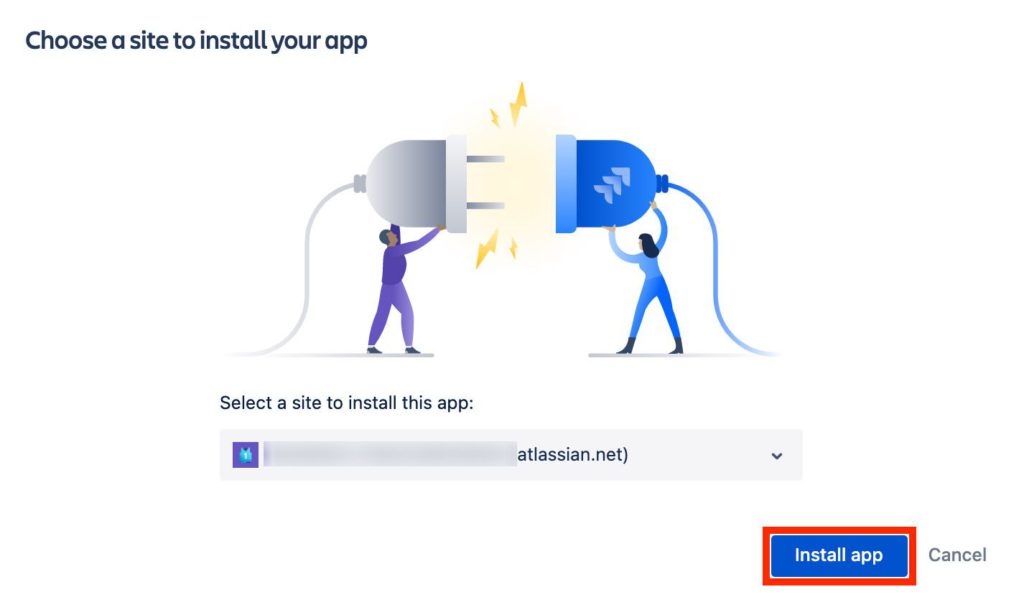
5. Choose which site you want to install the app on and click Install App. Keep in mind that you need to be an administrator in your Jira account to be able to proceed.
If you already have an Everhour account:
If you already have an Everhour account, you can actually install Everhour straight from your Jira dashboard. From the dashboard, click Apps at the bar on top. A dropdown menu will show up. Click Find New Apps.
You can take a look at how to track time spent on Jira with the help of Everhour:
📩 Authorizing Everhour on Jira
Now that you have Everhour linked to your Jira platform, you need to authorize it.
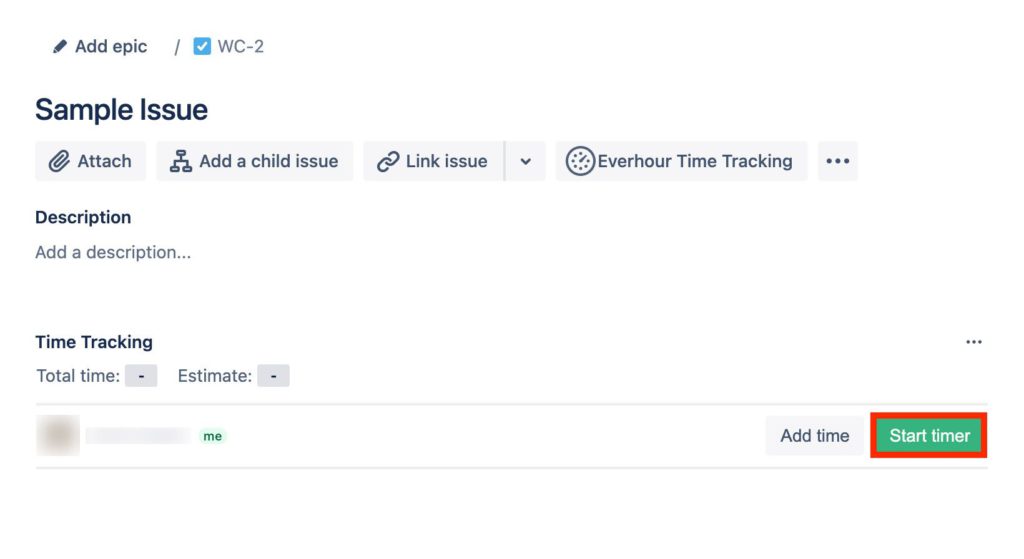
1. Go to any project and select any issue. You should see Everhour Time Tracking as one of the options below the issue name. Click it.
2. An Everhour login field will appear. Enter your Everhour account credentials and click Sign in.

3. Now you can start using the Everhour timer on your Jira project.
📋 Features
Everhour is an excellent time tracker Jira plugin, but it’s so much more than that. With this handy management platform, you can get the following features.
- ✔️ Access to a feature-rich pre-set dashboard for all of your documentation and analytics needs. This includes tools such as estimates, reminders, auto-stops, automation, and more.
- ✔️ Resource management functionalities such as client management, invoicing, budgeting, labor cost calculations, and custom task rates.
- ✔️ Team collaboration features, including role-setting, max hour limits, summary charts, time error corrections, and more.
💲 Pricing
To access all of Everhour’s features, you will need to purchase a Team plan subscription, which costs $8.50 per month per user, when billed annually. Alternatively, the monthly billing option will cost you $10 per month per user. There is also a Free plan providing basic features, and Lite plan that includes payroll and invoicing, along with some other features.
👀 Learn what real users say about Everhour:
“We really like the Gsuite integration and the integration with Jira. We regularly get compliments from our clients as we send very detailed report on where company time is spent on.” [Bas, Capterra]
“The reporting feature is so easy to use and can be configured any way we need. It’s much stronger than other tools we’ve used in the past. It also integrates so well with our project management software.” [G2]
“Everhour is the perfect tool if you have several clients and want to organize your working time. I can keep track of every job, every task and this is very good both for me because I have an overview of my work and for my client, because I can keep track of the working time and the amount to be paid accurately.” [Carolina, Capterra]
Agile Time Tracking With Jira Wrap Up
Jira is an all-in-one platform for your agile project management needs. This means that you get to have unbeatable functionality for all your agile project needs, regardless of the framework that you’re thinking of using.
Undeniably, time tracking is one of the most essential demands of agile project management. Through accurate and dynamic time tracking, you can better allocate resources and make correct estimations, especially when presenting the next deliverables for your project. There are multiple ways to track time in Jira. Here are the most common ones.
🕜 Jira’s native time tracker
You can track your work time in Jira by manually inputting your hours in Jira time tracking fields for every issue you’re working on. However, this native solution is inefficient, especially since you must manually type in your hours and keep your time for every issue.
💡 Atlassian plugins
While the Marketplace provides an array of Jira plugin time tracking functionalities, it’s important to note that the popularity of some top plugins may be attributed to their longevity and market presence rather than their features. It’s recommended to explore and test multiple plugins to find the one that best suits your needs, as the top-ranking ones may not necessarily offer the most optimal features.
🔧 Browser extensions
Enhancing the Jira interface with a browser extension is becoming a popular alternative to native add-ons. Many tools choose this approach for its flexibility in rendering and placement, ultimately improving usability and speed. Native Jira controls, while functional, may not match the quick response time achieved through browser extensions.
Jira Time Tracking Report
Keeping track of your time and presenting it in clear reports have several definite benefits, such as:
- Convenient invoicing. Having an accurate record of your time makes it easy for you to invoice clients and communicate your work process.
- Understandable visual reports. Time tracking lets you be more transparent to your stakeholders and partners because you can easily communicate precisely how you’re spending your time using engaging and easily-understandable visual reports.
- Informed task management. If you know how much time is being spent on specific assignments, project leaders can make more informed decisions about the delegation and timing of tasks, allowing for a more efficient workflow.
- Implementable feedback. Truthful records allow you to properly assess your team’s performance and give strategic feedback that can actually be implemented in the next stages of your project.
- Accurate delivery estimates. Delivery time estimation is one of the most challenging tasks when managing complex projects. A Jira time tracking report by the user allows you to eliminate guesswork and make accurate estimates based on real data.
- Easy integrations. With the right figures at your disposal, you can better decide which aspects of your Jira workflow to improve. Once you can identify this, you can easily identify the integrations you need in Atlassian’s rich marketspace.
You can have some or most of those benefits with any other time tracker out there. However, most project management tools and Jira alternatives aren’t optimized to deliver analytical reports.
On the other hand, Jira can offer time tracking metrics that are useful to any project, particularly software development, such as:
- Time Spent. This metric will display the total time spent working on a particular issue, useful for prioritization, determining overdue, and feedback
- Original Estimate. The Jira estimate time feature is an analytical metric that displays your team’s estimated time of finishing an issue based on existing data
- Estimated Time Remaining. The current running estimate of how long the ongoing issue will take, adjusted for specific conditions
- Accuracy. This metric displays how close your actual time (Estimated Time Remaining plus Time Spent) is to the Original Estimate
Final Words
Jira is a powerful project management platform that lets you manage complex agile projects without breaking a sweat. However, one weakness is its impractical time logging capabilities. You can address this issue by installing third-party integrations.
One of the best Jira integrations on the market is Everhour. Everhour is an excellent Jira time tracker that offers so much more; with this integration, you can access time tracking, resource management, and team collaboration tools in one seamless package.
If you are managing a team of 5 or more and looking to boost efficiency, Everhour is the perfect tool to keep your team on track. With seamless time tracking, you can easily estimate task durations, set clear budgets, and generate detailed reports inside Asana, Trello, Jira, or any other pm tool.

Maria
A dedicated content enthusiast with extensive experience in international teams and projects of all sizes. Maria thrives on creativity and attention to detail, fueled by a love for fantasy novels, music, classic black-and-white films, and always finding ways to make things better.