GitLab Tutorial: Your Ultimate Guide for All Skill Levels

If you are looking for a better way to organize your project files, you should consider using GitLab. The beauty of GitLab is that it allows all team members to collaborate in all phases of a project, simplifying software development for all involved. In this GitLab tutorial for beginners, you will learn how to use GitLab’s main features to manage your files and increase productivity (and even learn how Gitlab time tracking works with a help of Gitlab time tracking integration!)
❓ GitLab Definition
GitLab is a web-based Git repository that allows software development teams to plan, code, test, deploy, and monitor product changes in one place.
Git is a versioning system that tracks changes and enables pushing/pulling updates using remote resources.
GitLab offers free, open, and private repositories, along with issue tracking and wikis. It helps teams collaborate throughout the software development lifecycle, enhancing product value and user satisfaction.
🚩 Essential GitLab Basics
We’ll start with the GitLab tutorial basics—its main features, pricing, installation, and how to use it.
Planning
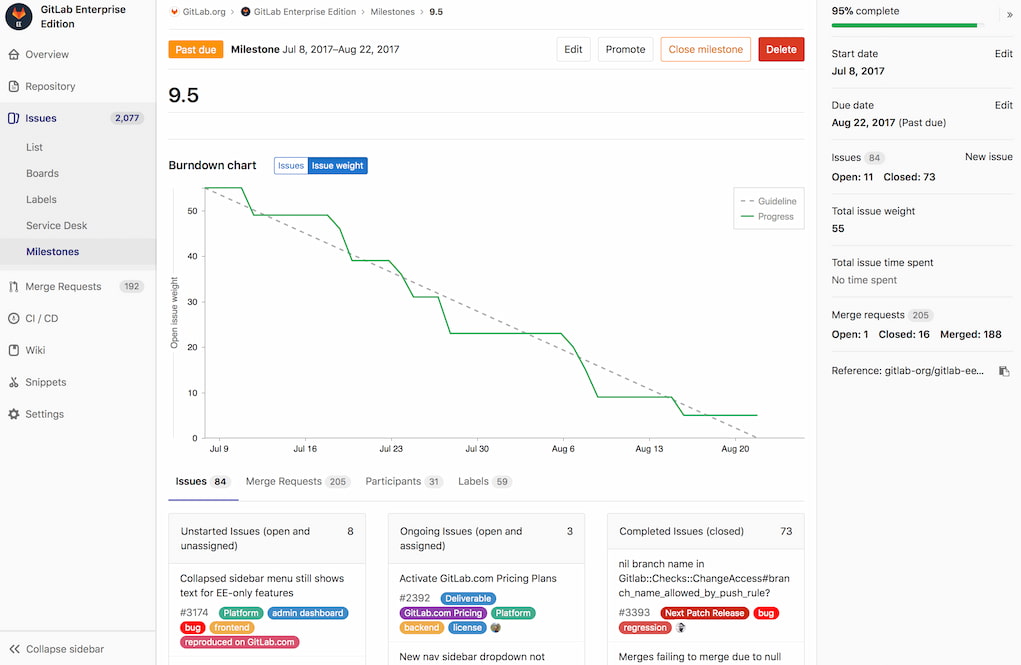
GitLab offers powerful planning tools to keep your team in sync. The platform enables planning and management through epics, milestones, and groups, allowing teams to organize and track GitLab project progress.
Coding
GitLab tutorial wouldn’t be complete without mentioning that GitLab allows you to create, view, and manage project data and code through branching tools. The platform helps you plan, organize, align, and then track project work to ensure all team members are working on the right tasks.
Verification
Ensure strict quality standards are enforced for production code with automatic reporting and testing. GitLab’s capabilities enable a range of testing types to provide quick feedback to testers and developers about their code’s quality.
Package management
GitLab offers built-in package management, allowing teams to package applications and dependencies, build artifacts and manage containers easily.
Security
GitLab provides a range of security capabilities, including Dynamic Application Security Testing (DAST), Static Application Security Testing (SAST), Dependency Scanning, and Container Scanning, enabling teams to create and maintain secure applications.
Releasing software
GitLab enables you to view, sort, and automate the release of applications, which significantly shortens the delivery lifecycle and streamlines processes. GitLab’s integrated Continuous Development solution allows you to release software with zero-touch, regardless of the number of servers.
Configuration
GitLab allows you to configure applications and infrastructure, as strong integration to Kubernetes reduces the effort required to define and configure supporting infrastructure.
Monitoring
GitLab enables you to reduce the frequency and severity of software incidents, so you can release software knowing that all will go to plan.
Business performance
GitLab gives you valuable insights into how your business is performing. You can manage and optimize team performance and the software delivery lifecycle with metrics to streamline processes and increase the frequency of software releases.
For example, you can gain insights into the performance of individual users, subgroups, and projects such as triage hygiene, issues created or closed in a given period, the average time for merge requests to be completed, and more. Plus, you can generate DevOps reports, usage trends overviews, and audit reports, allowing you to determine if changes are needed to improve business processes.
Integrations
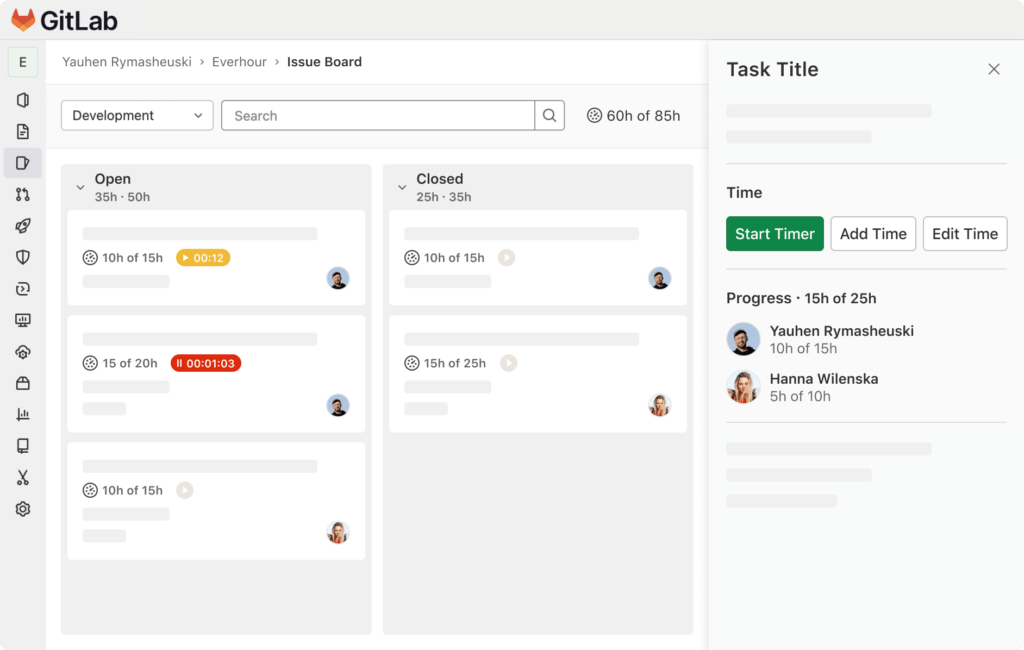
Did you know that you can utilize GitLab time-tracking integrations? For example, if you need employee time tracking functionality to monitor the time you and your team spend on the issues and merge requests, but you also need access to a time clock app/timesheet app, work hours tracker, and an attendance tracker, consider integrating GitLab with a time tracker like Everhour. You can also use those integrations to extract Gitlab time tracking reports to facilitate your project management process.
🔎 Check out what real users have to say about Everhour:
“The elaborate reporting capabilities in Everhour give valuable information about time and team efficiency, which enables us to maximize our resource usage. The feature of integrating Everhour with our project management tools results in the convenience of a well-organized and smooth-running workflow.” [Okoth, Capterra]
“Creates absolute rransparency on where staff are spending their time. Very useful tool as a leader of our organization. I really appreciate the daily, weekly, and monthly reports automatically sent to me.” [Kaden, Capterra]
“The only time tracking tool that doesn’t drain my time! Simple really is best for reducing cognitive load – Everhour gets that. It not only tracks my time it respects it.” [Kelsey, G2]
Hosting & installing
Many prefer to use GitLab in Linux, as GitLab software is custom-made for the open-source operating system and is mature and scalable. You can install GitLab on Windows, but there are some restrictions. To get around this, you can install GitLab Runner.
Once you have installed GitLab, created an account, and logged in, you will be presented with various options, including creating a project or a group. You can also explore public GitLab projects that may pertain to your work.
Gitlab pricing
| Feature | Free | Premium | Ultimate |
|---|---|---|---|
| Price | $0/user/month | $29/user/month (billed annually) | Contact Sales |
| Storage | 5GB | 5GB+ | More than 5GB+ |
| Transfer | 10GB/month | 10GB+/month | More than 10GB+/month |
| CI/CD minutes | 400 | 10,000 | 50,000 |
| Users per namespace | 5 | More allowed | Unlimited + free guests |
| Code review | Basic | Faster reviews | Faster reviews |
| Advanced CI/CD | No | Yes | Yes |
| Security & compliance | No | No | Advanced testing & compliance pipelines |
| Planning tools | Basic project planning | Enterprise agile planning | Portfolio & value stream management |
| Support | Community | Priority support | Full support |
🔧 Using GitLab Effectively
If you haven’t used GitLab before, it may appear intimidating at first. But don’t worry, it’s a learning curve—after using the platform for a while, you’ll learn the ins and outs of GitLab and it will soon become second nature. Using this GitLab tutorial, you should be able to quickly learn how to navigate the platform.
How to create a project
The majority of work done on GitLab happens within a project, as code and files are saved in projects.
- To create a project in GitLab, you select Menu > Project > Create new project.
- You will then be presented with the Create a new project page, where you can either create a new project or create a project from a built-in template, custom template, or a HIPAA audit protocol template.
Alternatively, if you are a GitLab administrator, you can import a project from another repository.
How to create a project from a template
A built-in GitLab project template fills a new project with files to help get you started.
- To create a project from an established built-in template, select Menu > Projects > Create new project and select Create from template.
- Next, click the Built-in tab and view template previews.
- Once you find a suitable template, click Use template.
- Next, enter the project details, including Project name, Project slug, and Project description. You can also change viewing and access rights by changing the project Visibility level.
To create a GitLab project from a custom template, follow the above steps, but rather than Built-in, choose Instance or Group tab. You can preview templates, and once you have found a suitable template, select Use template and enter the project details.
How to create a group
You create groups in GitLab to manage one or more projects simultaneously and manage permissions. If someone has access to the GitLab group, they will have access to all projects within the group. Another benefit of creating a group is that you can view all issues and merge requests for all projects in the group and access analytics for all activities within your chosen group.
- To create a group in GitLab, you select Menu > Groups > Create group.
- Then, to the left of the search box, you select the plus sign and click New group.
- Select Create group and enter a group name. Be mindful that some group names, if used, would be in conflict with existing routes used by GitLab. As a result, there are some reserved names that you cannot use.
- Next, enter a path for your group in Group URL, which is used for the namespace, a unique name for a user, group, or subgroup.
- Then, choose a visibility level (public, internal or private) and personalize the group by defining your role, who will be using the group, and what the group will be used for.
- Then, all that is left to do is invite all relevant GitLab members to join the group.
Project forking workflow

When working in a Git repository, it is recommended that you use branching strategies to manage work effectively. But if you do not have write access to the repository of your choice, you can create a fork. A fork is a duplicated version of the original repository where you can make changes without affecting the original project.
- To create a fork in an existing GitLab project, select Fork on the project’s homepage.
- Then, if you want to, edit the Project name.
- For the Project URL, select the namespace where your fork should reside.
- Next, add a Project slug, which is added to the fork URL. Please note that it must be unique in the chosen namespace.
- If you like, you can add a Project description to provide context.
- Then, you need to select the Visibility level for your new fork.
- Select Fork project. Once you have done that, you will be redirected to the new fork’s page.
- If you find that you need to remove a fork, select Settings > General > Advanced.
- Then, select Remove fork relationship and confirm this action by typing the project path.
- Please note that only project owners have the necessary permissions to remove a fork relationship in GitLab.
👍 GitLab Tutorial: Final Thoughts
While there are many great GitLab alternatives, GitLab remains a solid choice for developers thanks to its built-in compliance tools, scalability, and flexible deployment options.
This GitLab tutorial covered the basics—creating projects, groups, and forks. Once you’re comfortable with those, there’s still more to explore. We hope this guide helped you get up and running quickly!

Maria
A dedicated content enthusiast with extensive experience in international teams and projects of all sizes. Maria thrives on creativity and attention to detail, fueled by a love for fantasy novels, music, classic black-and-white films, and always finding ways to make things better.