How to Host a Website on GitHub for Free: A 2026 Guide
![how to host a website on github in 2023 [step-by-step]](https://everhour.com/blog/wp-content/uploads/2023/03/markus-winkler-ZDwh_sxsX2g-unsplash.jpg)
You’ve built your first website and want to share it with the world, but web hosting costs are daunting. What if you could host your site for free on a reliable platform used by millions of developers? Enter GitHub Pages. This guide teaches you how to host a website on GitHub for free, covering the essentials—from creating a repository to publishing your site. We’ll explore the benefits and limitations of GitHub hosting, walk through the deployment process, and even show how time tracking with Everhour can help you manage your web project effectively.
What Is GitHub Pages?
GitHub Pages is a feature offered by GitHub that allows you to serve static websites directly from a GitHub repository. A static site contains HTML, CSS, and JavaScript, but no server-side scripting (e.g., PHP, Python). GitHub automatically builds your site and publishes it at a github.io URL.
🧠 Key benefits
- Free hosting: No monthly fees or usage charges.
- Custom domains: Use your own domain name at no extra cost.
- Version control: Use Git to track changes and roll back if needed.
- Continuous deployment: Push changes to your repository; GitHub rebuilds your site automatically.
- SSL/TLS: GitHub Pages provides HTTPS encryption out of the box.
❌ Limitations
- Static content only—no server-side languages or databases.
- Bandwidth limited to personal projects; heavy traffic may require additional services.
- Some advanced features (e.g., build pipelines) require knowledge of GitHub Actions.
Overview of Steps to Host a Site on GitHub for Free
- Create a GitHub account if you don’t have one.
- Install Git on your computer (or use GitHub Desktop).
- Create a new repository to store your website files.
- Add website files (HTML, CSS, JavaScript).
- Commit & push these files to GitHub.
- Configure GitHub Pages in the repository settings.
- Access your website at the provided URL or add a custom domain.
We’ll explore each step in detail.
Step 1: Sign up for GitHub
If you’re new to GitHub, go to github.com and create an account. Choose a username that will be used in your site’s URL (username.github.io).
Personal vs. organization accounts
- Personal account: Suitable for individual projects, portfolios, or blogs.
- Organization account: Ideal if you’re hosting a website for a company or group, allowing multiple collaborators.
![how to host a website on github in 2023 [step-by-step]](https://everhour.com/blog/wp-content/uploads/2023/03/Join-GitHub-%C2%B7-GitHub.jpg)
Step 2: Install Git (or GitHub Desktop)
You can manage your project through the Git command line or GitHub Desktop (a GUI version). To install Git:
- Download and install Git from git-scm.com.
- Configure your username and email with:
git config --global user.name "Your Name"
git config --global user.email "you@example.com"
Alternatively, install GitHub Desktop from desktop.github.com and follow the setup wizard.
Step 3: Create a new repository
- Log in to GitHub.
- Click the + icon in the upper-right corner and choose New repository.
- Name the repository using the format username.github.io if you want to host a user or organization site. For project-specific sites, use any name (e.g., portfolio).
- Keep the repository Public (required for free GitHub Pages).
- Initialize with a README file (optional but recommended).
- Click Create repository.
Step 4: Add website files
Now you need to add your website files to the repository. Two methods:
Option A: Upload via Web UI
- In your repository, click Add file → Upload files.
- Drag and drop your HTML, CSS, and JS files.
- Commit the changes.
Option B: Use Git (recommended for continuous updates)
1) Clone the repository:
git clone https://github.com/username/username.github.io.git
cd username.github.io
2) Add files:
Place your index.html, styles.css, and script.js in the cloned folder. Use this minimal index.html:
<!DOCTYPE html>

<html>

<head>

    <title>My Portfolio</title>

    <link rel="stylesheet" href="styles.css">

</head>

<body>

    <h1>Welcome to My Site!</h1>

    <p>This is hosted on GitHub Pages.</p>

</body>

</html>
3) Commit and push:
git add .
git commit -m "Initial commit"
git push origin main
Your files are now on GitHub.
Step 5: Configure GitHub Pages
- Go to your repository settings.
- Select Pages from the sidebar.
- Under Source, choose the branch (usually main) and the folder (root or /docs) containing your static files.
- Click Save.
GitHub builds your website and assigns it a URL in the format https://username.github.io/ or https://username.github.io/repository-name/ for project sites. It may take a few minutes to appear.
Step 6: Custom domain (optional)
Want your site accessible at a custom domain (e.g., mydomain.com)? Configure a CNAME:
- Buy a domain from a registrar (e.g., Namecheap).
- Add a CNAME record pointing to username.github.io.
- In your GitHub repository, go to Settings → Pages → Custom domain.
- Enter mydomain.com and save.
- Follow GitHub’s instructions to enable HTTPS.
Step 7: Maintain & update your site
- Editing: Update your local files or use GitHub’s online editor. Commit and push; GitHub rebuilds your site automatically.
- Branching & pull requests: Use branches to experiment with changes. Create pull requests for review before merging to main.
- CI/CD: Use GitHub Actions for automated testing or build steps (e.g., compile Sass to CSS).
Time Tracking & Productivity for Web Projects
Hosting a site is one thing; delivering updates on schedule is another. Tracking time ensures you’re spending resources wisely. While GitHub doesn’t offer native time tracking, it integrates with tools that do.
Using Everhour with GitHub
Everhour integrates via browser extensions to track time on issues and pull requests:
- Add timers: Each issue or pull request displays a time tracking button. Start/stop the timer without leaving GitHub.
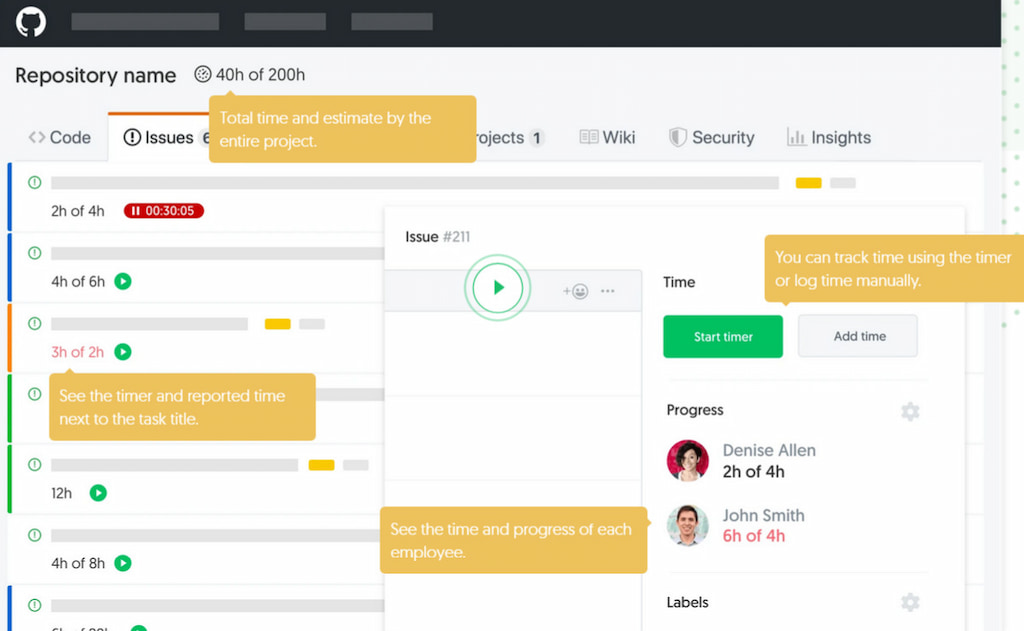
- Track budgets: Set a time estimate for tasks. Everhour alerts you when you near or exceed the estimate.
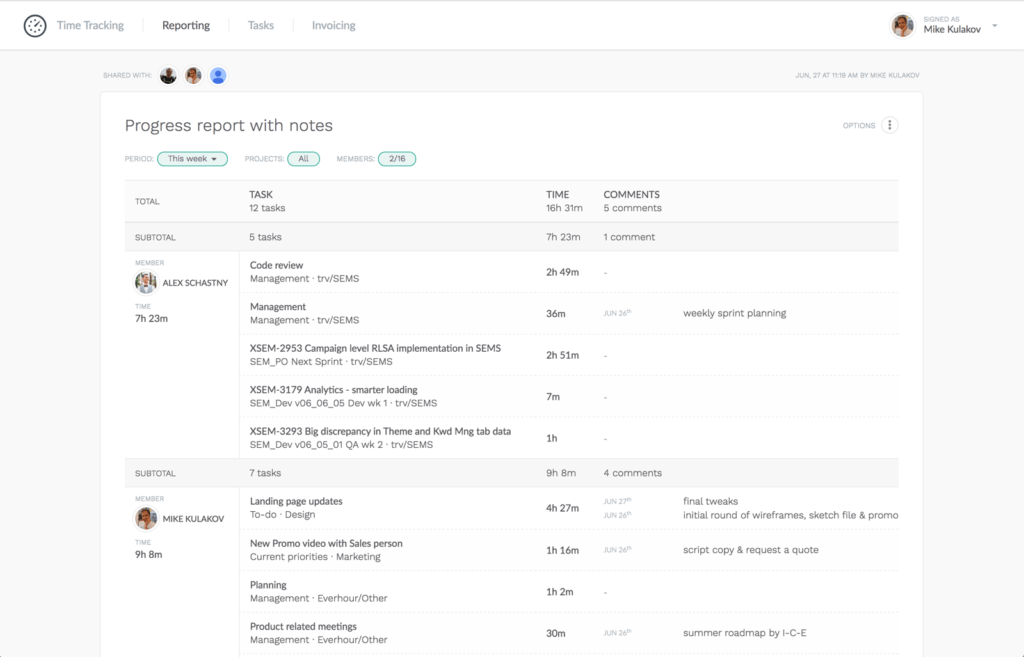
- Reporting: Generate reports showing hours spent per page, feature, or bug fix. This helps estimate future tasks.
- Invoicing: For freelancers building websites for clients, Everhour can create invoices based on tracked time.
- Privacy: Everhour does not track websites or take screenshots—it focuses solely on time spent.
Example
You’re building a website for a client. You create issues for tasks like “Design navbar,” “Implement contact form,” and “Deploy to GitHub Pages.” You set a budget of five hours for the project. As you work, you start the Everhour timer on each issue. Everhour tracks your progress, letting you know if you’re on schedule. At the end, you generate a report showing the total time spent, ensuring accurate billing.
GitHub Alternatives for Website Hosting
While GitHub Pages is excellent for static sites, you might need more features:
- Netlify: Simplifies deployment with drag-and-drop or CLI; supports serverless functions, automatic HTTPS, and form handling.
- Vercel: Popular for hosting Next.js, React, and static sites; supports serverless functions.
- GitLab Pages: Similar to GitHub Pages, but integrated into GitLab’s ecosystem.
- Cloudflare Pages: Free static hosting with global CDN; supports serverless functions through Cloudflare Workers.
- Firebase hosting: Hosts static or dynamic content, integrates with Firestore and serverless functions.
Consider alternatives if you need dynamic functionality or advanced build pipelines.
Tips & Best Practices
- 📝 Keep content static: GitHub Pages is best for static sites (blog, portfolio, documentation). For dynamic features (login, database), use serverless functions or another host.
- 🌐 Use a CNAME file: If you set a custom domain, add a CNAME file with the domain to your repo for consistent mapping.
- ⚙️ Set up automatic deployments: Use GitHub Actions to build static site generators (Jekyll, Hugo) before deploying to Pages.
- 🔒 Secure your repo: Never commit secrets (API keys). Store them in environment variables if using Actions.
- 🚀 Monitor performance: Use tools like Google PageSpeed Insights to optimize load times.
- 🛑 Enable 404 page: Create a 404.html to handle broken links gracefully.
- 🌱 Use branches: Keep a dev branch separate; deploy only production-ready code.
- 📖 Document changes: Clear commit messages help track updates and allow easy rollbacks.
- 💻 Test locally: Preview your site before pushing using a local server (e.g.,
python -m http.server). - 🔐 Leverage free SSL: Always enable HTTPS in GitHub Pages settings.
Frequently Asked Questions: How to Host a Website on GitHub
Can I use a custom domain with GitHub Pages?
Yes. GitHub Pages supports custom domains at no extra cost. Configure DNS (CNAME/ALIAS records) and set the domain in the Pages settings.
Do I need to know Git to host a site?
No. You can upload files via the GitHub web interface. However, knowing Git simplifies updates and version control.
What types of sites can I host?
Any static site—blogs, portfolios, documentation, or simple business sites. Static site generators like Jekyll, Hugo, Gatsby or Docusaurus can build sites easily.
Is GitHub Pages secure?
Yes. GitHub Pages provides HTTPS by default. Security largely depends on your code and whether you expose secrets in the repository.
How much traffic can GitHub Pages handle?
GitHub doesn’t publish limits, but personal and project sites generally handle moderate traffic. High-traffic sites may need a CDN or alternative hosting.
Can I run a backend on GitHub Pages?
No. GitHub Pages doesn’t support server-side code. Use serverless functions on Netlify, Vercel, or AWS Lambda for backend tasks.
What is GitHub Copilot? Does it help with GitHub Pages?
GitHub Copilot is an AI-powered coding assistant that suggests code. It can help you write HTML, CSS and JavaScript faster. It’s separate from GitHub Pages but complements development.
Do I need an SSL certificate?
GitHub Pages provides SSL/TLS for github.io domains. For custom domains, GitHub can automatically configure HTTPS via Let’s Encrypt.
How does Everhour integrate with GitHub?
Everhour offers a browser extension that adds a timer to GitHub issues and pull requests. It logs time directly within the GitHub interface and compiles reports for billing or analysis.
Are there limits to free hosting?
GitHub Pages is free for open-source and personal projects. Private repositories require a paid GitHub plan. Bandwidth is not explicitly limited but is subject to fair use.
How to Host a Website on GitHub: Final Thoughts
Hosting a website on GitHub is a free, reliable option for developers, designers, and businesses. GitHub Pages makes web hosting accessible through Git and the world’s largest developer community. You can set up your site quickly, manage updates with version control, and track issues and milestones with ease.
Adding a time tracking tool like Everhour brings transparency to projects. Freelancers and teams can track time on issues and pull requests, stay within budget, and generate accurate invoices.
Together, GitHub Pages and Everhour help you build, deploy, and manage websites efficiently. Start small—your first site could become a professional portfolio or larger web presence.
🔧 Launching your next site? Start using Everhour for free and learn how to track time with Everhour on GitHub.
🔎 Check out real reviews from users about Everhour:
“I liked how I could quickly log hours directly from my project management tool, ensuring accurate time reports for all my tasks.” [Manon, Capterra]
“I like the flexibility and scalability potential of the tool which allows us to track many projects we manage all at once.” [Oyaro, Capterra]
“Everhour has made my life so much easier when it comes to tracking time and managing projects. The reporting capabilities are awesome. I can easily see where I am spending time and adjust if necessary.” [Daniel, G2]
More Info on GitHub
GitHub can be tricky to navigate at first. Before you dive in, take some time to go through this guide—it’ll make hosting on GitHub much easier for you and your team. Once you’re ready, check out these helpful links:
Pages: https://docs.github.com/en/pages
Repository: https://docs.github.com/en/repositories
Documentation: https://docs.github.com/en
For improving web development skills, here are some recommended reading resources:
Mozilla Developer Network: https://developer.mozilla.org/
W3Schools: https://www.w3schools.com/
CSS Tricks: https://css-tricks.com/
Smashing Magazine: https://www.smashingmagazine.com/
📚 Read more on GitHub topics

Maria
A dedicated content enthusiast with extensive experience in international teams and projects of all sizes. Maria thrives on creativity and attention to detail, fueled by a love for fantasy novels, music, classic black-and-white films, and always finding ways to make things better.