Implementing a simple but complete timeline of your project’s flow from beginning to end is critical for keeping management and teams on track and maximizing efficiency. This quick guide to creating a project timeline will provide some information about:
✅ what is a project timeline and why do you need one;
✅ what your timeline should do for you;
✅ how to create a timeline for your next project in 8 simple steps.
This article delves into the intricacies of project timelines and explores the vital role that the best time tracking software plays in their mastery.
Understanding Project Timelines: Key to Project Success
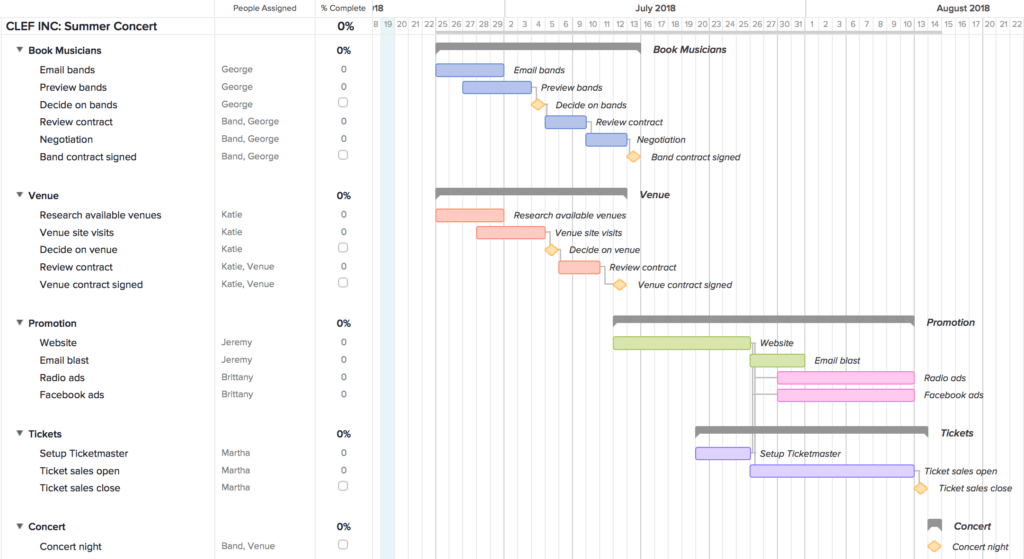
A project timeline is a list of tasks and events within your project in visual form and in chronological order from start to finish. The project timeline is usually a bar chart with tasks and dates outlined.
The definition of a project timeline is simple. However, it may still be prudent to mention some of the ways a concrete timeline can benefit you and your team:
- The project management timeline provides a visual source for the multiple phases and tasks within the project. This makes it easier to understand and coordinate specific tasks and overlook their progress.
- It also gives an anchor for prioritizing which tasks are most important.
- It provides managers and team members with the overview they need to predict and be prepared to handle changes, challenges, or setbacks within the project.
All of the above gives managers the ability to adjust the project plan accordingly for optimal time management. This also helps balance the workload and prevent overburdening parts of the team while underutilizing others.
Editor’s note: using a good time tracker for teams helps tremendously with this process, too. If you’re on the fence about using a time tracking solution for your team, this article may help!
Types of Project Timelines: Choosing the Right One for Your Team
While at its core, the project timeline is a pretty simple concept, there are various types of visualization methods available for creating one. What you use will depend on your and your team’s preferences, as well as the type and scope of your project.
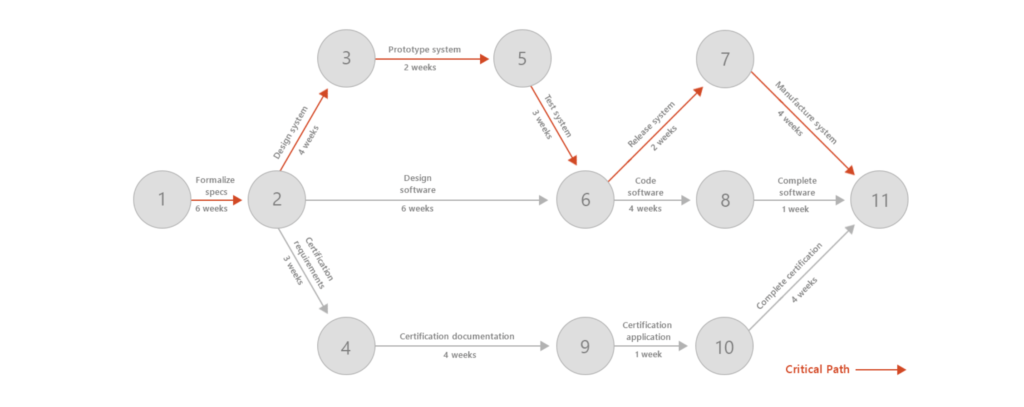
A Gantt chart, a PERT chart, or just a plain linear timeline are the most common choices when it comes to visualizing a project timeline.


8 Essential Steps to Create a Project Timeline
Now that we’re armed with the basics, let’s take a look at the eight steps to creating a project timeline!
1. Define the scope of your project
In a nutshell, the scope of the project is a clear, simplified statement of the goal and phases of your project. Example: “We will plan and execute a content marketing campaign for Client X”
2. Define your deliverables
What is your deliverable? What are the unique project deliverables (i.e., products, services, or results)? Example: “We will brainstorm, research, create, publish and promote 10 powerful blog posts for Client X”
3. Define your tasks
Now that we know the project’s scope and what the deliverables are, we’ll begin to determine the tasks associated with each of those deliverables.
Example: “To create 10 blog posts for the client, we need to develop a blog content plan; research, write and edit the texts of each; develop the visuals for each post; upload and prepare each post for publishing; schedule each post to go live at a date and time specified in the content plan.”
4. Define project dependencies
Now that you’ve identified what tasks need to be completed to achieve your goal, it’s essential to figure out which tasks have dependencies. In other words, which tasks will require the completion of other tasks before they can begin.
Example: “Writing a blog post is dependent upon completion of a blog content plan. Preparing and uploading the post for publishing is dependent upon the completion of the text and media files. Scheduling the post for publishing is dependent upon completion of uploading.”
5. Estimate the time needed to complete each task
Review your task list, and determine how long it will take to complete each task assuming each person assigned to their task is working at an average-to-optimal pace.
Example: “Writing a blog post takes our copywriter 4 hours. Creating visuals for a blog post takes our designer 2 hours. Uploading and scheduling the blog post takes our content manager 1 hour.”
6. Determine the availability of your resources
“Resources” can fall under a few categories. Still, more often than not, the resources that come with the most issues or limitations will be human resources.
Review your team members’ schedules and determine what kind of time they will have free to spend on a designated task. Review your tasks and time calculated for those tasks, and use them to match up tasks with team members.
Editor’s note: everyone’s work efficiency is different. When assigning team members to tasks, knowing the history of an employee’s timed productivity is crucial. A reliable time management tool with a feature showing the history of your employees’ time utilization can be a project manager’s best friend.
7. Determine your projects’ important milestones
Now that you are aware of all project tasks and task dependencies, you need to identify some checkpoints along the way to be able to monitor your progress. Such checkpoints are also known as “project milestones“.
You have full creative freedom in choosing your project milestones. But bear in mind that all milestones of the project taken together should represent a sequence of events that build up until your project’s goals are achieved.
8. Build your project management timeline!
After the other steps are aligned, and once you’ve chosen your method of visualization, go ahead and create your project timeline. Open your software of choice or grab a pen and paper, and start organizing your tasks in chronological order with the dependencies in mind.
Remember to label your tasks with who is responsible and accountable for their completion. Visualize how long each task will take along your timeline. Take into consideration the resources required for each. Finally, assign milestones to round it out. Now go forth and get started!
A Few Last Words…
Seeing your project organized on paper (or screen…) with dates, tasks, and assigned resources all laid out on a neat visual timeline will get you and your team motivated to take care of business.
Make it a team collaboration. You’ll get the added benefits of cooperation and satisfaction at completing a project well done… and well-timed!
If you are managing a team of 5 or more and looking to boost efficiency, Everhour is the perfect tool to keep your team on track. With seamless time tracking, you can easily estimate task durations, set clear budgets, and generate detailed reports inside Asana, Trello, Jira, or any other pm tool.

