Once you know about GitHub time tracking, what GitHub is, and how to use GitHub to host websites, you can move further and take full advantage of everything GitHub offers. One such thing is GitHub Actions.
Software development isn’t just about writing code—it also means testing, deploying, and automating tasks so your team can focus on building features. GitHub Actions is a built-in tool on GitHub that makes automation and CI/CD simple and powerful. Whether you’re an individual developer or part of a large team, learning GitHub Actions can improve your workflow. This tutorial shows you what GitHub Actions is, how to set up workflows, build CI/CD pipelines, try practical examples, and connect tools like Everhour’s time tracker to boost productivity.
What Is GitHub Actions?
GitHub Actions is an event-driven automation and continuous integration/continuous deployment (CI/CD) service built into GitHub. It allows you to automate tasks in your software development lifecycle—such as building, testing, and deploying code—by defining workflows triggered by events like pushes, pull requests, or issue creation. Actions run in GitHub’s hosted environment or your self-hosted runners and support all major programming languages.

Key features
- CI/CD pipelines: Build and test code on every commit or pull request.
- Event triggers: Start workflows based on events (e.g., code pushes, issue comments).
- Reusable actions: Compose workflows using pre-built actions or create your own.
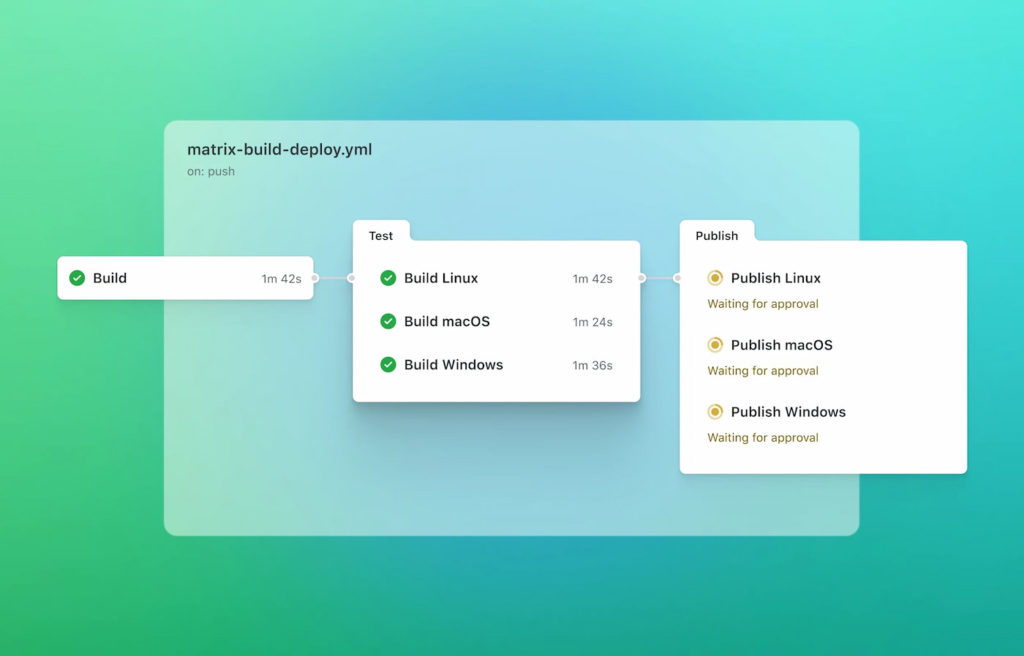
- Matrix builds: Test across multiple environments or versions.
- Self-hosted runners: Run workflows on your own infrastructure for custom environments.
- Marketplace: Thousands of community actions for various tasks.
Why Use GitHub Actions?
- 🚀 Integration with GitHub: No external CI server required. Workflows live next to code.
- ⚡ Flexibility: Write workflows in YAML; use Docker containers or your own runners.
- 💰 Cost-effective: Generous free minutes on public repositories. Paid plans available for private repos.
- 📈 Scalability: Hosted runners scale automatically; matrix builds test across many versions.
- 🌐 Community support: An active marketplace and a wide array of tutorials.
Overview of a GitHub Actions Workflow
A GitHub Actions workflow consists of one or more jobs defined in a YAML file. Each job comprises steps that run commands or actions. Workflows are stored in the .github/workflows directory of your repository.
Example build.yml:
name: Build and Test

on:
  push:
    branches: [ "main" ]
  pull_request:
    branches: [ "main" ]

jobs:
  build:
    runs-on: ubuntu-latest
    steps:
      - uses: actions/checkout@v3
      - name: Set up Node.js
        uses: actions/setup-node@v3
        with:
          node-version: 18
      - name: Install dependencies
        run: npm install
      - name: Run tests
        run: npm test
This workflow triggers on pushes or pull requests to main, checks out code, sets up Node.js, installs dependencies, and runs tests.
Key Components of a GitHub Actions Workflow
- name: Optional; names the workflow.
- on: Defines events that trigger the workflow (push, pull_request, schedule, etc.).
- jobs: Contains one or more jobs executed sequentially or in parallel.
- runs-on: Specifies the environment (runner) where the job runs (ubuntu-latest, windows-latest, macos-latest or self-hosted).
- steps: Individual tasks within a job, either shell commands or reusable actions.
- uses: Specifies an action to use (e.g., actions/checkout).
- run: Runs shell commands directly.
- with: Passes inputs to actions (e.g., node-version: 18).
Setting Up Your First GitHub Action
Let’s walk through a simple CI workflow:
- Create repository: Either create a new repository or use an existing one.
- Add .github/workflows directory: Create this folder at the root.
- Create a YAML file: Add ci.yml in .github/workflows.
- Define the workflow:
Example ci.yml:
name: CI

on: [push, pull_request]

jobs:
  test:
    runs-on: ubuntu-latest
    steps:
      - uses: actions/checkout@v3
      - name: Set up Python
        uses: actions/setup-python@v4
        with:
          python-version: 3.10
      - name: Install dependencies
        run: pip install -r requirements.txt
      - name: Run tests
        run: pytest
This workflow runs tests on any push or pull request. Whenever you push code or submit a PR, GitHub automatically triggers the workflow.
- Commit & push: Commit the file and push to GitHub. You will see a new check on pull requests or commits under the “Actions” tab.
GitHub Actions for CI/CD: Deploying Applications
To deploy applications, combine build and deployment steps.
Example: Deploy to Netlify after successful tests:
Example deploy.yml:
name: Build and Deploy

on:
  push:
    branches: [ main ]

jobs:
  build:
    runs-on: ubuntu-latest
    steps:
      - uses: actions/checkout@v3
      - name: Install dependencies
        run: npm install
      - name: Build
        run: npm run build
      - name: Deploy to Netlify
        uses: nwtgck/actions-netlify@v2
        with:
          publish-dir: ./dist
          production-branch: main
          NETLIFY_AUTH_TOKEN: ${{ secrets.NETLIFY_AUTH_TOKEN }}
          NETLIFY_SITE_ID: ${{ secrets.NETLIFY_SITE_ID }}
Here, deployment occurs only on push to the main branch, ensuring changes are tested before going live.
Advanced Concepts
Matrix builds
If you need to test multiple versions or environments, use a build matrix. Example: Test Python versions 3.8 and 3.10:
jobs:
  test:
    runs-on: ubuntu-latest
    strategy:
      matrix:
        python-version: [3.8, 3.10]
    steps:
      - uses: actions/checkout@v3
      - uses: actions/setup-python@v4
        with:
          python-version: ${{ matrix.python-version }}
      - run: pip install -r requirements.txt
      - run: pytest
Matrix builds run jobs concurrently for each Python version.
Scheduled jobs
Run tasks at fixed times (cron-like). For example, run daily at midnight:
on:
  schedule:
    - cron: '0 0 * * *'
Useful for backups, routine clean-up, or data collection.
Self-hosted runners
You can run Actions on your infrastructure, which may be necessary for proprietary environments or heavy workloads. Register a runner with GitHub, then set runs-on: [self-hosted].
Reusable workflows
Define workflows reusable across multiple repositories or jobs. Example:
# .github/workflows/build.yml

on:
  workflow_call:
    inputs:
      node-version:
        required: true
        type: string

jobs:
  build:
    runs-on: ubuntu-latest
    steps:
      - uses: actions/checkout@v3
      - uses: actions/setup-node@v3
        with:
          node-version: ${{ inputs.node-version }}
      - run: npm install
      - run: npm test
Then call it from other workflows:
on: [push]

jobs:
  build:
    uses: ./.github/workflows/build.yml
    with:
      node-version: 18
GitHub Actions Examples
1. Linting and formatting
name: Lint

on: pull_request

jobs:
  lint:
    runs-on: ubuntu-latest
    steps:
      - uses: actions/checkout@v3
      - uses: actions/setup-node@v3
        with:
          node-version: 18
      - run: npm install
      - run: npm run lint
      - run: npm run format:check
2. Building and deploying a Docker app
name: Build & Push Docker

on:
  push:
    branches: [main]

jobs:
  build:
    runs-on: ubuntu-latest
    steps:
      - uses: actions/checkout@v3
      - name: Build image
        run: docker build -t myapp:${{ github.sha }} .
      - name: Log in to registry
        uses: docker/login-action@v2
        with:
          registry: ghcr.io
          username: ${{ github.actor }}
          password: ${{ secrets.GITHUB_TOKEN }}
      - name: Push image
        run: docker push ghcr.io/myorg/myapp:${{ github.sha }}
3. Automatic labeling based on PR content
name: Build & Push Docker

on:
  push:
    branches: [main]

jobs:
  build:
    runs-on: ubuntu-latest
    steps:
      - uses: actions/checkout@v3
      - name: Build image
        run: docker build -t myapp:${{ github.sha }} .
      - name: Log in to registry
        uses: docker/login-action@v2
        with:
          registry: ghcr.io
          username: ${{ github.actor }}
          password: ${{ secrets.GITHUB_TOKEN }}
      - name: Push image
        run: docker push ghcr.io/myorg/myapp:${{ github.sha }}
The .github/labeler.yml file defines rules for labeling PRs.
Benefits and Limitations
| Aspect | GitHub Actions | Benefits | Limitations |
|---|---|---|---|
| Integration | Built into GitHub | Easy setup, no external tools | Locked to GitHub ecosystem |
| Cost | Free for public repos; paid for private | Low entry cost | Heavy usage requires paid plan |
| Flexibility | YAML workflows, self-hosted runners | Configurable, supports many languages | Steep learning curve |
| Community actions | Marketplace with thousands available | Reuse proven workflows | Quality can vary |
| Security | Secrets management, permissions | Protects private data | Errors can expose secrets |
Workflow Integration: Everhour & GitHub Actions
Everhour is a time tracking tool integrated into GitHub via browser extensions. While it doesn’t directly interact with GitHub Actions, it plays a complementary role:
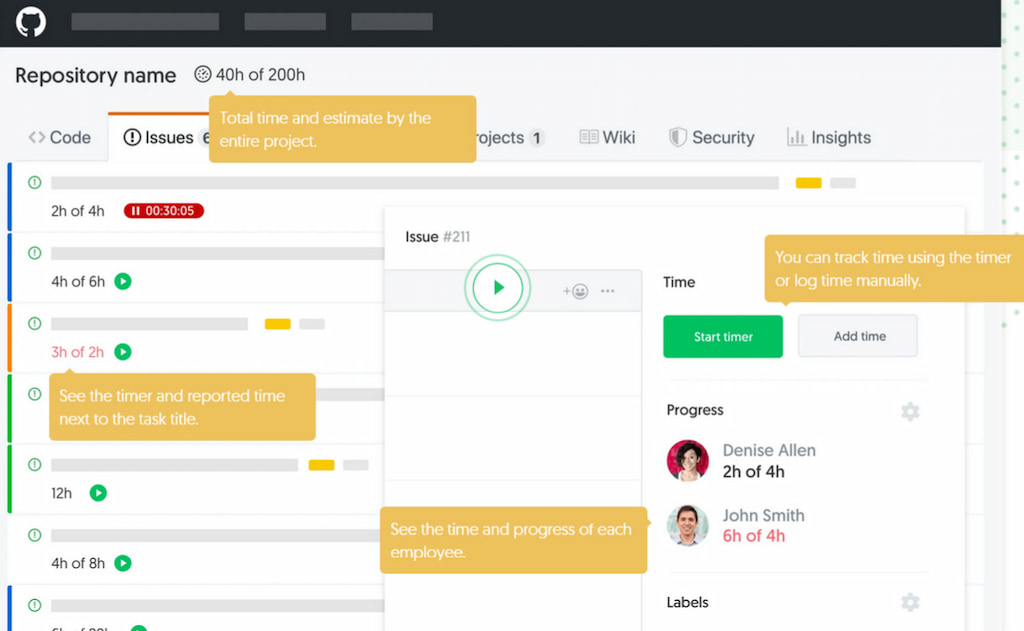
- Time logging: Track how much time tasks take, including setting up workflows.

- Project estimates: Compare estimated vs. actual time for automation projects.
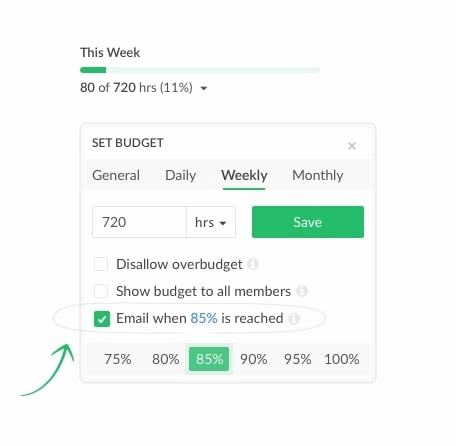
- Budgeting: Set budgets for projects; Everhour alerts you as you approach limits.

- Reporting & billing: Generate reports for time spent on CI/CD tasks.
- Team visibility: Managers can see how much time is allocated to automation vs. other projects.
Example:
Your DevOps team is tasked with implementing a CI/CD pipeline using GitHub Actions. Track time spent on designing workflows, writing YAML configurations, and debugging runs. Everhour helps quantify the effort, ensuring project timelines and budgets are realistic.
Tips & Best Practices
- 🟢 Start small: Begin with basic workflows. Automate a simple test or lint step, then gradually build complexity.
- 🔒 Use secrets: Store sensitive tokens (AWS_ACCESS_KEY_ID, etc.) securely in GitHub Secrets. Never hard-code secrets.
- 🛠️ Leverage marketplace: Use community actions to avoid reinventing the wheel (e.g., code coverage, notifications).
- 📦 Keep jobs isolated: Separate jobs for build, test, and deploy. Use
needsto create dependencies. - ⚡ Use caching: Cache dependencies to speed up workflows. Example:
actions/cache@v3for node_modules or pip. - 🔁 Avoid redundancy: Use composite actions or reusable workflows for repeated tasks across repositories.
- 📊 Monitor usage: Track minutes used (especially in private repos) to avoid unexpected bills.
- ❌ Fail fast: Configure tests to fail quickly on critical errors, saving time.
- 📖 Document workflows: Document workflows and their triggers for your team.
- 🖥️ Use self-hosted runners wisely: Set up self-hosted runners if needed for specific environments or cost savings. Keep them updated for security.
Frequently Asked Questions
What languages does GitHub Actions support?
It supports any language runnable on Linux, Windows, or macOS because you can run shell commands. Official actions exist for Node.js, Python, Java, Go, .NET, Ruby, PHP, and more.
How many free minutes do I get?
GitHub provides free minutes for public repositories. For private repos, you receive a quota depending on your plan. Enterprises can purchase extra minutes. Usage resets monthly.
Can I deploy to AWS/Azure with GitHub Actions?
Yes. Use marketplace actions for AWS (e.g., aws-actions/configure-aws-credentials) or Azure (e.g., azure/webapps-deploy). Provide credentials via secrets.
What’s the difference between Actions and GitHub Workflows?
A “workflow” is the file defining automation. An “action” is a reusable function that performs a specific task. A workflow can use multiple actions.
Do I need Docker knowledge?
Not always. Many actions run in the default environment. For custom environments, you can build a Docker container.
How do I store secrets securely?
Under repository settings → Secrets. Store API keys or tokens there. In workflows, reference them as ${{ secrets.MY_SECRET }}.
Can self-hosted runners access private resources?
Yes. Runners on your infrastructure can access private networks, making them useful for on-prem deployments. They’re subject to your security policies.
Are GitHub Actions secure?
When configured properly, yes. Use least-privilege tokens, avoid untrusted code, and restrict secrets to necessary workflows.
How does Everhour integrate with GitHub?
Install Everhour’s browser extension, which adds a timer button on GitHub issues and pull requests. Track time, generate reports, and set budgets.
Do I need Everhour if I use GitHub Actions?
Everhour isn’t required for Actions, but complements project management. It’s useful for tracking time spent on automation tasks and ensuring budgets.
GitHub Actions Tutorial: Final Thoughts
GitHub Actions automates tasks like testing and deployment with seamless GitHub integration, flexible YAML configs, and a vast marketplace. You can build simple CI workflows or advanced pipelines with features like matrix builds and scheduled jobs.
Manage secrets securely, use caching and reusable actions, and track effort with tools like Everhour to keep projects on time and budget. Mastering GitHub Actions helps teams deliver quality software faster and more efficiently.
🔎 Check out what real users have to say about Everhour:
“We could easily assess work loads for each individual remote worker, assess what tasks took longer than anticipated, and most importantly see any discrepancies in the day to day tasks. It enabled task handling to become easier to manage.” [Georgia, Capterra]
“The easy way to integrate these with CRM’s like Asana and ClickUp. Time can be added individually or in batches per week. You can also track time off and select if those are holidays, sick leave, paid or unpaid time.” [Claudia, G2]
“The reporting feature is so easy to use and can be configured any way we need. It’s much stronger than other tools we’ve used in the past. It also integrates so well with our project management software.” [G2]
📌 Useful links & resources
- GitHub Actions Docs
- Everhour GitHub Integration
- GitHub Actions Examples
- GitHub Marketplace
- Jenkins vs GitHub Actions
- GitHub Copilot vs Microsoft Copilot
- Azure DevOps vs GitHub

