Wrike Workflows: Custom Statuses, Approvals, and Automation
Workflows are the backbone of efficient project management, and Wrike workflows help teams keep tasks, approvals, and processes organized from start to finish. Workflows provide a clear path for work to move forward. With Wrike, workflows aren’t just static steps—they’re customizable stages, automated rules, and visual boards that give teams visibility and control over every task. In this article, we’ll break down how Wrike workflows work, show how to set them up within Wrike’s project management, and share tips for optimizing them so your team can work smarter, not harder.
❓ What Is a Wrike Workflow?
A Wrike workflow is a set of stages that a task moves through from start to completion. Think of it as a roadmap for work—each task has a status, and the workflow shows what comes next.
Workflows are designed to make team processes consistent, visible, and easy to track. Instead of guessing whether a task is ready, in progress, or blocked, everyone can see the exact status at a glance.
Key points about Wrike workflows
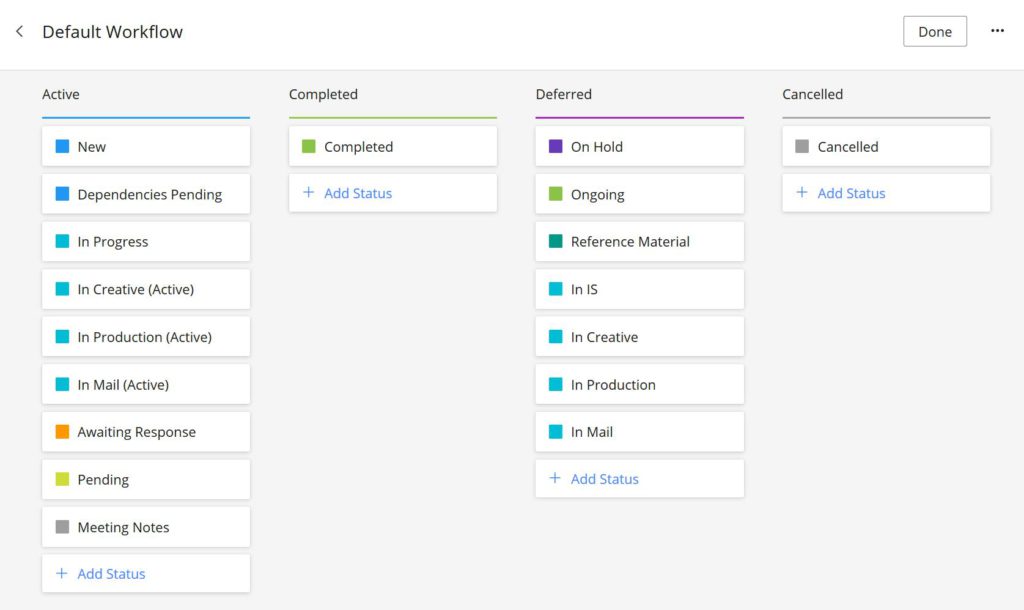
- Custom statuses – Create stages that reflect your actual process, like “draft,” “in review,” or “approved.”
- Automation rules – Automatically assign tasks, send notifications, or update statuses based on triggers.
- Flexibility – Workflows can be simple for small teams or complex for multi-step projects with approvals and handoffs.
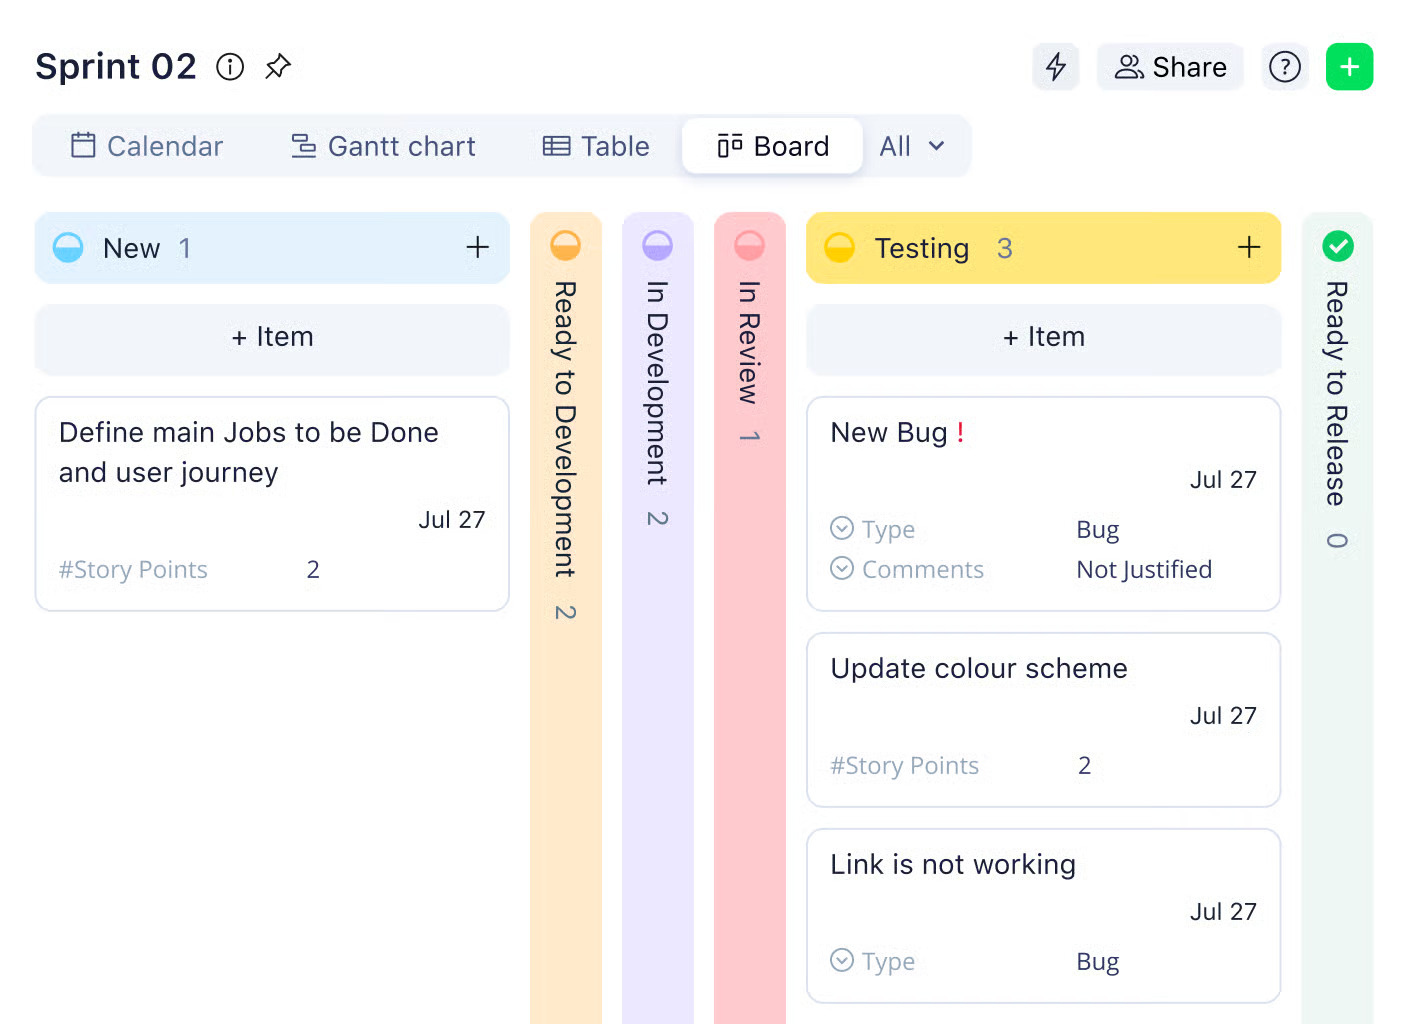
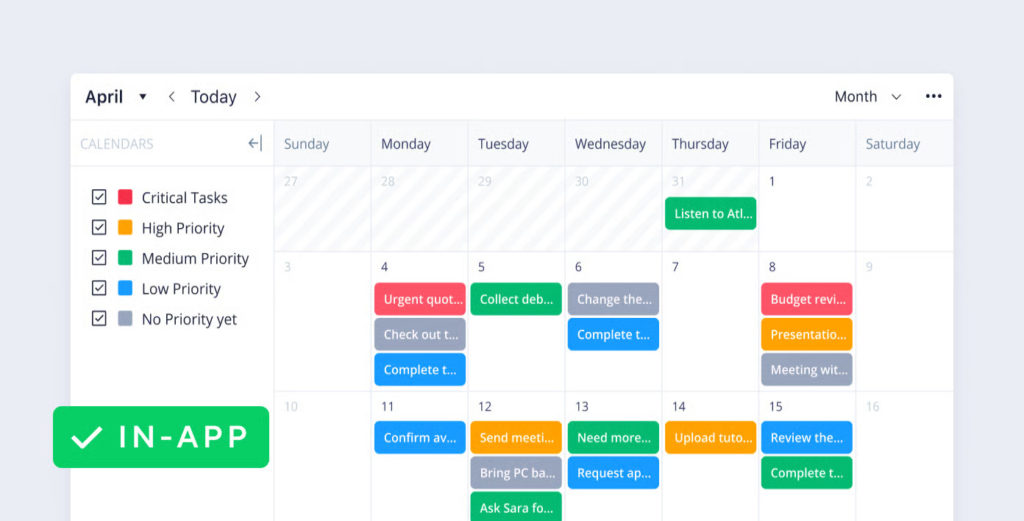
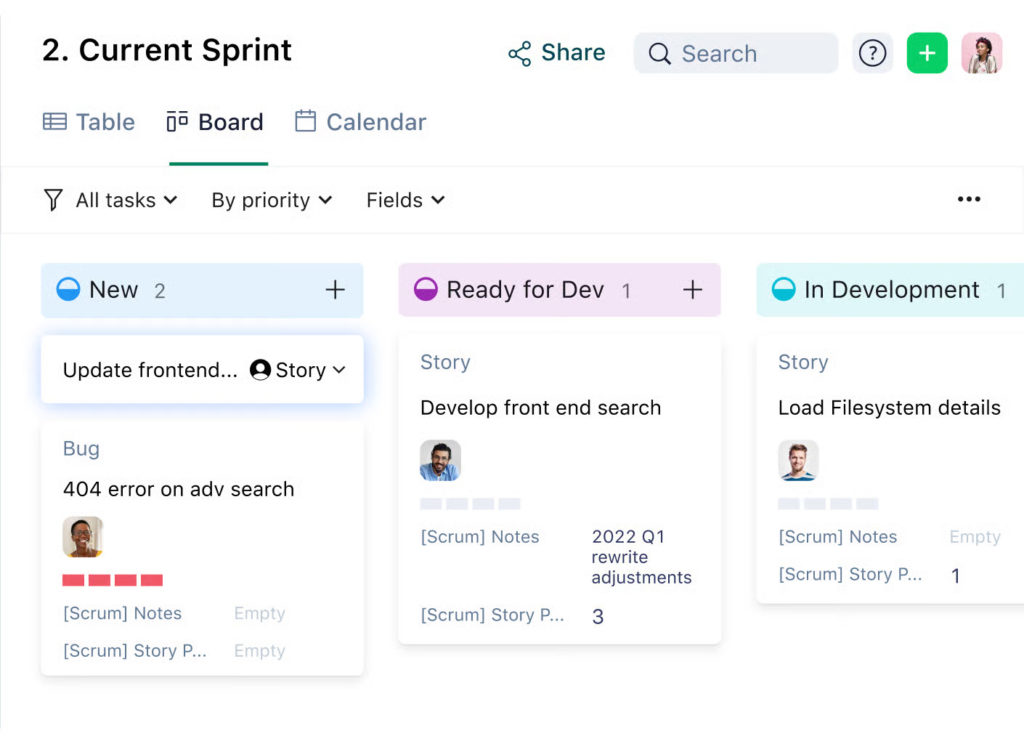
- Visual tracking – Use list, board, or Kanban views to see progress and spot bottlenecks quickly.
By structuring work with workflows, teams reduce confusion, speed up approvals, and keep projects moving smoothly without constantly checking in manually.
🔧 Core Features of Wrike Workflows
✅ Custom statuses
Create task statuses that reflect real stages of your work. Instead of generic labels like “in progress” or “done,” define stages such as “draft,” “in review,” “approved,” or “ready for QA.” This helps everyone know exactly where each task stands, reduces confusion, and ensures accountability across teams.
👥 Approvals & handoffs
Tasks that need multiple stakeholders can move seamlessly through Wrike. Workflows guide tasks from one person or team to the next, making sure reviews, edits, and approvals happen on time. This prevents bottlenecks and keeps work moving smoothly.
🤖 Automation rules
Automate repetitive steps to save time:
- Assign tasks automatically based on criteria
- Update task statuses without manual edits
- Send notifications when conditions are met
Automation reduces errors, keeps projects on track, and frees your team to focus on meaningful work.
📄 Templates & reusable workflows
Save time on recurring projects with templates. Create workflow templates for common processes, task sequences, or approval flows, then reuse them whenever needed. This ensures consistency, speeds up onboarding, and keeps high-priority projects structured across the organization.
By combining these features, Wrike workflows give teams a clear, repeatable structure for managing tasks, approvals, and project progress—all while reducing manual work and boosting efficiency.
🛠️ Creating and Customizing Workflows
Wrike makes it easy to create workflows that match your team’s process. Here’s how to start:
1️⃣ Build a workflow step by step
- Go to Workflow settings in Wrike.
- Add custom statuses that reflect each stage of your work, like “draft,” “in review,” “approved.”
- Connect statuses to show the natural flow of tasks from start to finish.
2️⃣ Set up automation rules
- Automatically assign tasks when they enter a status.
- Update task fields or send notifications without manual steps.
- Reduce errors and keep your team on track.
3️⃣ Name statuses clearly
- Use descriptive, action-oriented names so everyone knows what’s expected at each stage.
- Keep it simple and consistent to avoid confusion.
4️⃣ Align workflows with team processes
- Make sure the workflow reflects how your team actually works, not just a generic template.
- Include approval steps or handoffs where necessary.
5️⃣ Use visual cues for easier management
- Kanban boards – see tasks move through statuses at a glance.
- List views – track details like due dates, assignees, and priorities.
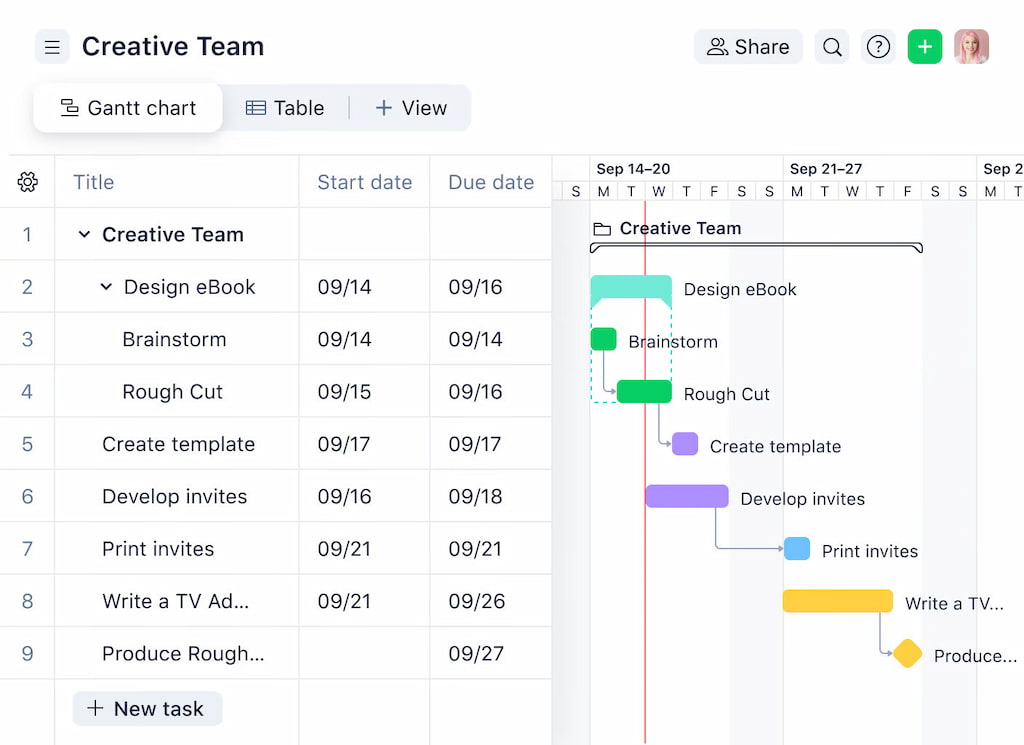
- Timelines – visualize dependencies and deadlines for complex projects.
By customizing workflows in Wrike, your team can stay aligned, reduce bottlenecks, and track progress clearly, all while keeping work flexible enough for different projects or teams.
✅ Best Practices for Wrike Workflows
1️⃣ Keep workflows simple and clear
- Avoid overly complicated steps or too many statuses.
- Everyone on the team should understand the workflow at a glance.
- Use descriptive status names that clearly show what’s expected.
2️⃣ Align workflows with project and team goals
- Make sure each workflow reflects how work actually gets done.
- Include approval steps, handoffs, or dependencies that are relevant to your team.
- Ensure the workflow supports both project objectives and team efficiency.
3️⃣ Regularly review and optimize workflows
- Check workflows periodically to see what’s working and what isn’t.
- Adjust statuses, automation rules, or templates to remove bottlenecks.
- Keep improving so your team stays productive and aligned.
By following these best practices, teams can use Wrike workflows to reduce confusion, speed up approvals, and keep projects on track.
🏷️ Use Cases by Team Type
📣 Marketing teams
- Manage campaign approvals and review cycles.
- Track content production from draft to publish.
- Automate notifications for feedback and sign-offs.
💡 Product teams
- Organize feature development with clear task ownership.
- Run sprints and releases efficiently using custom workflows.
- Track dependencies and handoffs across design, engineering, and QA.
⚙️ Operations teams
- Monitor process tracking and recurring tasks.
- Delegate work and ensure accountability.
- Use automation rules to reduce manual follow-ups and approvals.
Workflows in Wrike can be adapted to fit each team’s needs, helping everyone stay aligned, reduce bottlenecks, and complete work faster.
⚠️ Wrike Workflow Limitations and How to Overcome Them
Common gaps
- Cross-project dependencies can be tricky to manage, especially when tasks span multiple projects or teams.
- Effort tracking is limited natively, making it harder to see how much time or resources tasks actually consume.
- Complex workflows can become overwhelming if there are too many statuses or rules.
How to overcome these gaps
- Use Wrike integrations and add-ons to extend functionality. For example:
- A time tracker like Everhour to monitor actual vs estimated effort. Use Wrike time tracking integration to always know where your productivity bottlenecks are and track time inside Wrike.
- Reporting and analytics platforms to visualize cross-project dependencies and workload.
- Regularly review and simplify workflows to keep them aligned with team goals.
- Combine automation and dashboards to reduce manual work and spot bottlenecks faster.
By recognizing these limitations and adding the right tools, teams can make Wrike workflows more actionable and efficient, even for complex projects.
✅ Wrike Workflows: Conclusion
Wrike workflows help teams organize, track, and automate work across projects and departments. Custom statuses, approvals, automation rules, and reusable templates make it easier to standardize processes and keep everyone aligned.
At the same time, native workflows have limitations—like cross-project dependencies, effort tracking gaps, and complex workflow management. Recognizing these gaps early allows teams to plan solutions, whether by simplifying workflows or using integrations like Everhour for time tracking and reporting.
By combining thoughtful workflow design with the right tools, teams can maximize efficiency, maintain visibility, and scale their processes without losing control. Wrike workflows aren’t just about moving tasks—they’re about creating a structured system for execution that works for your team.

Maria
A dedicated content enthusiast with extensive experience in international teams and projects of all sizes. Maria thrives on creativity and attention to detail, fueled by a love for fantasy novels, music, classic black-and-white films, and always finding ways to make things better.